> ## Documentation Index
> Fetch the complete documentation index at: https://moengage-sarvam.mintlify.site/llms.txt
> Use this file to discover all available pages before exploring further.
# Set up MoEngage activity in SFMC
> Install and configure MoEngage custom activities, CloudPages, and Data Extensions in Salesforce Marketing Cloud so you can use MoEngage Push and Event activities in Journey Builder.
## Introduction
This guide provides detailed instructions for setting up MoEngage Custom Activities in Salesforce Marketing Cloud (SFMC). Follow these steps to ensure a smooth integration and usage.
**Prerequisites**
* Salesforce Marketing Cloud Access: Administrator and Marketing Cloud Administrator permissions are required.
* MoEngage API Credentials: Ensure you have access to your MoEngage APIs (Settings > Accounts > APIs).
## Step 1: Set up MoEngage custom activity
To set up the MoEngage custom activity, perform the following steps:
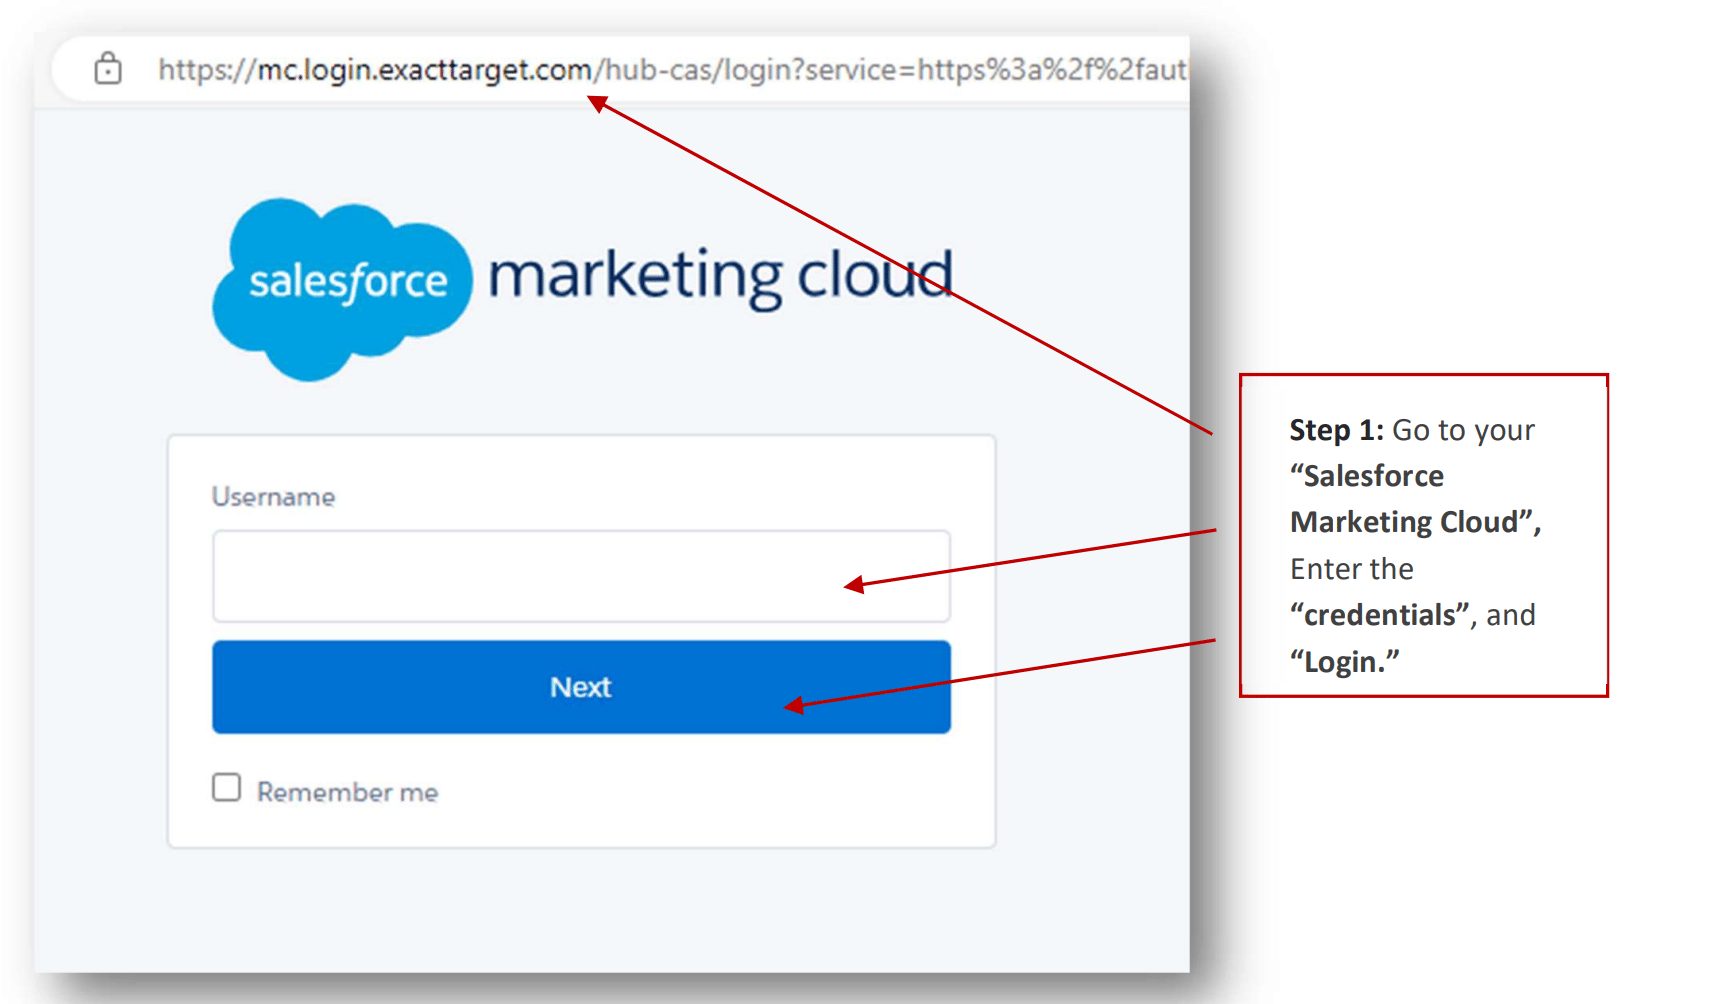
1. Log in to your Salesforce Marketing Cloud (SFMC).
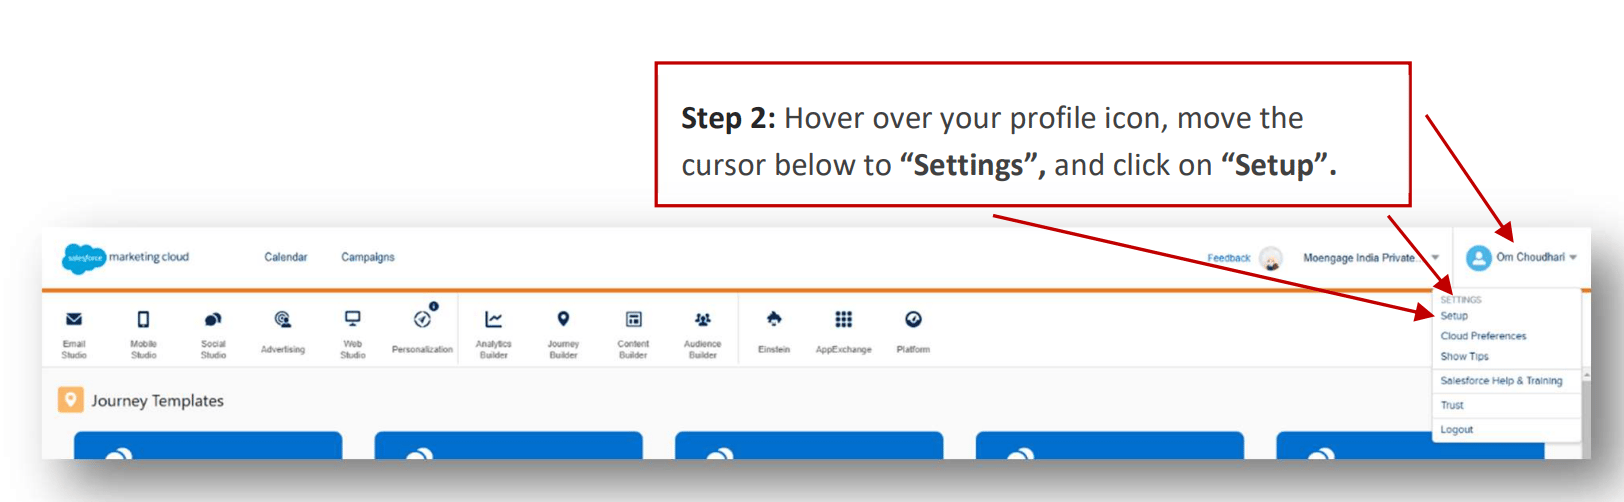
 2. Access SFMC settings.
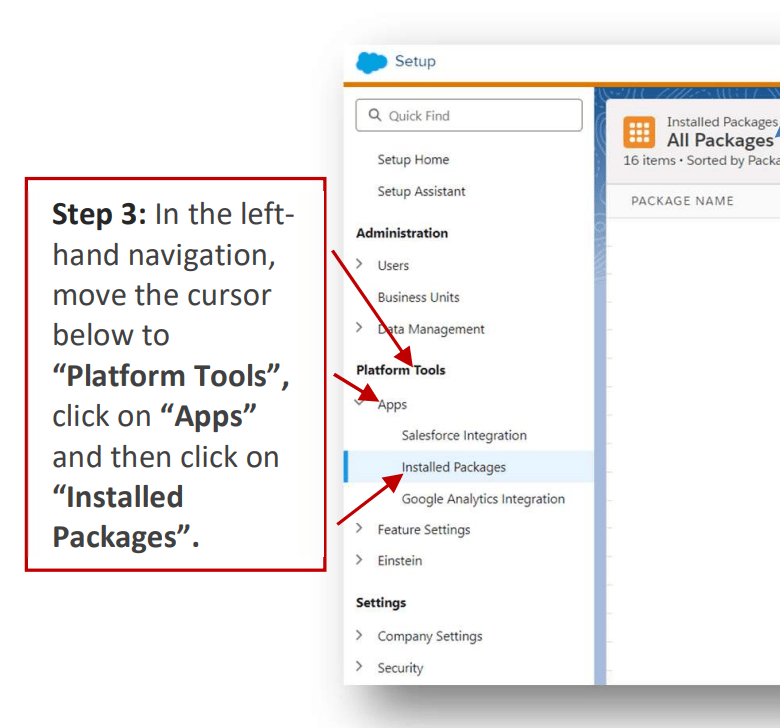
 3. Once you click on "Installed Packages", this tab will be visible on the right side of the page.
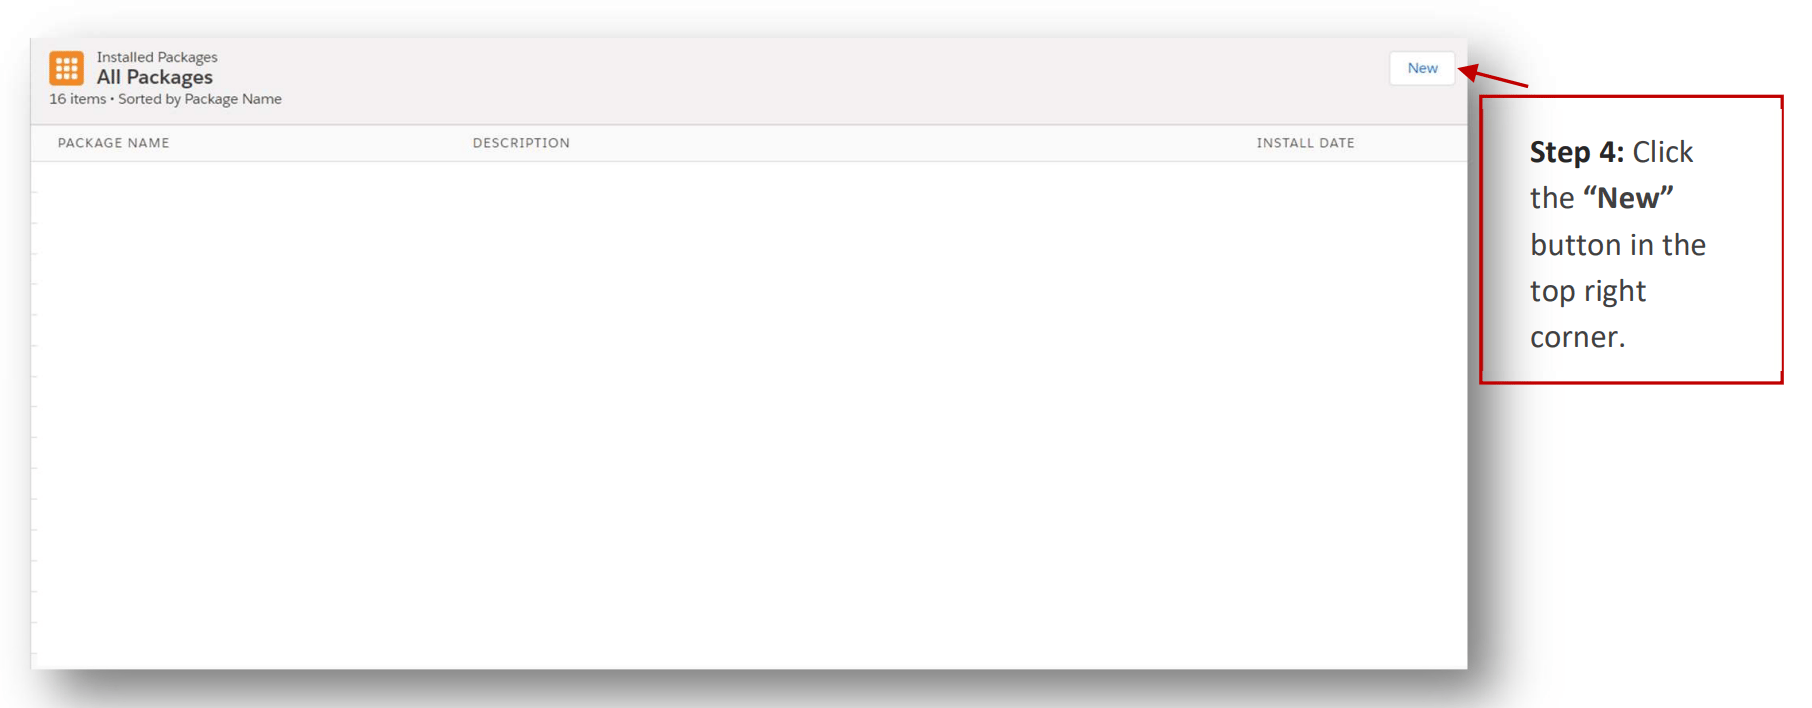
 4. Create a new package.
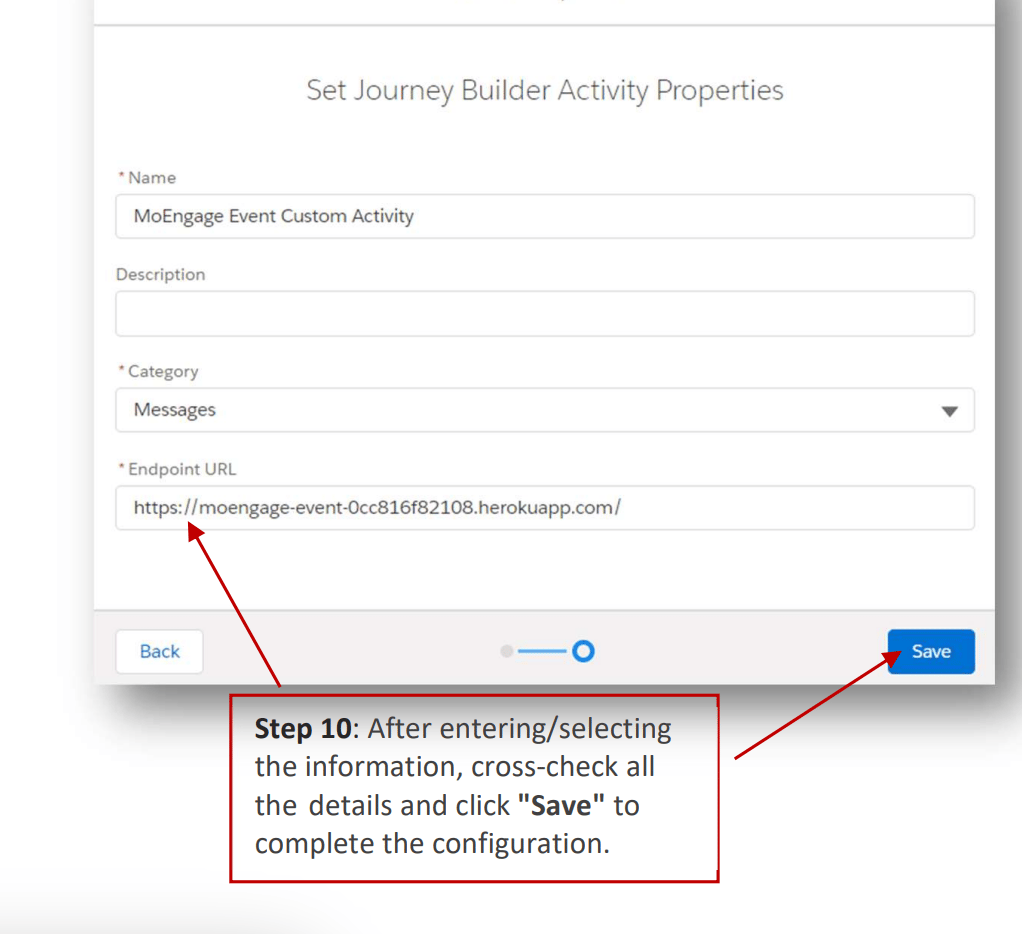
 5. Add package details. You can name it "MoEngage Custom Activity" and add description as "Used to send one-time push notifications and run Event Trigger campaigns".
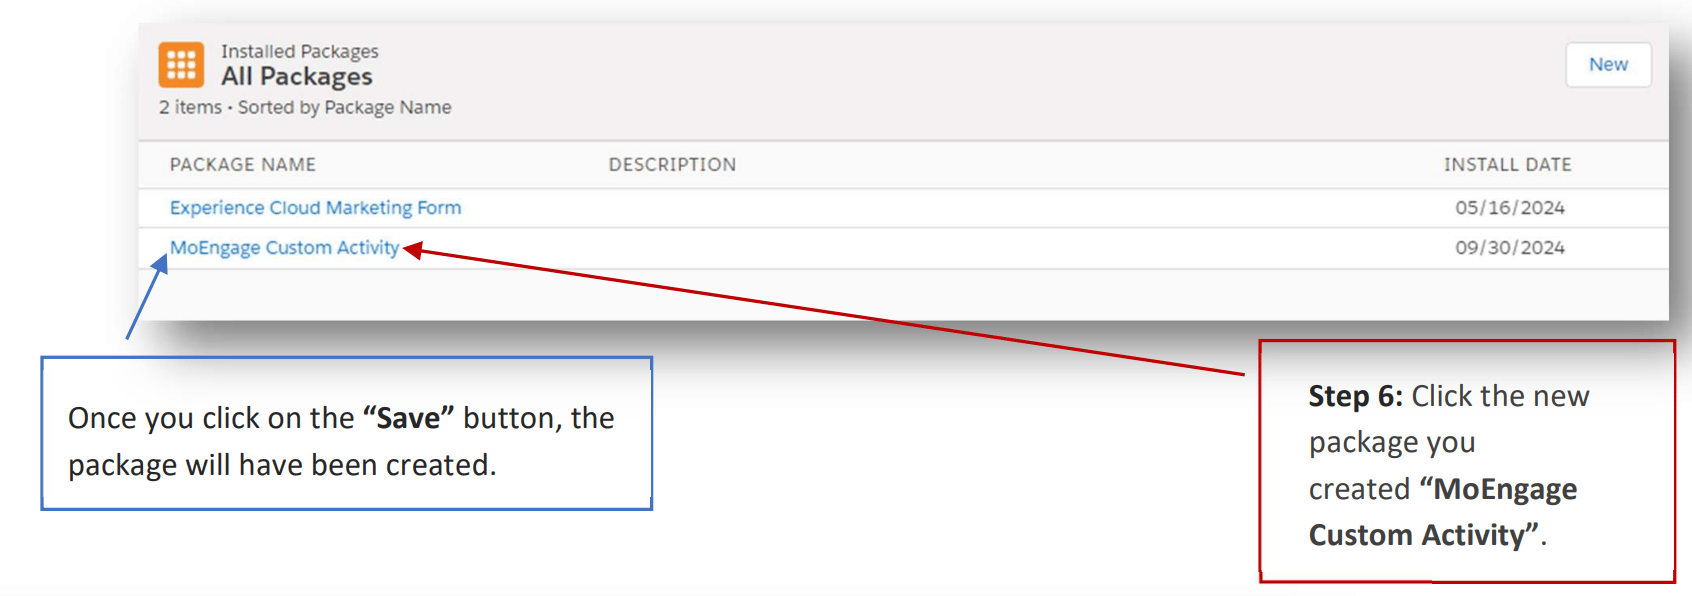
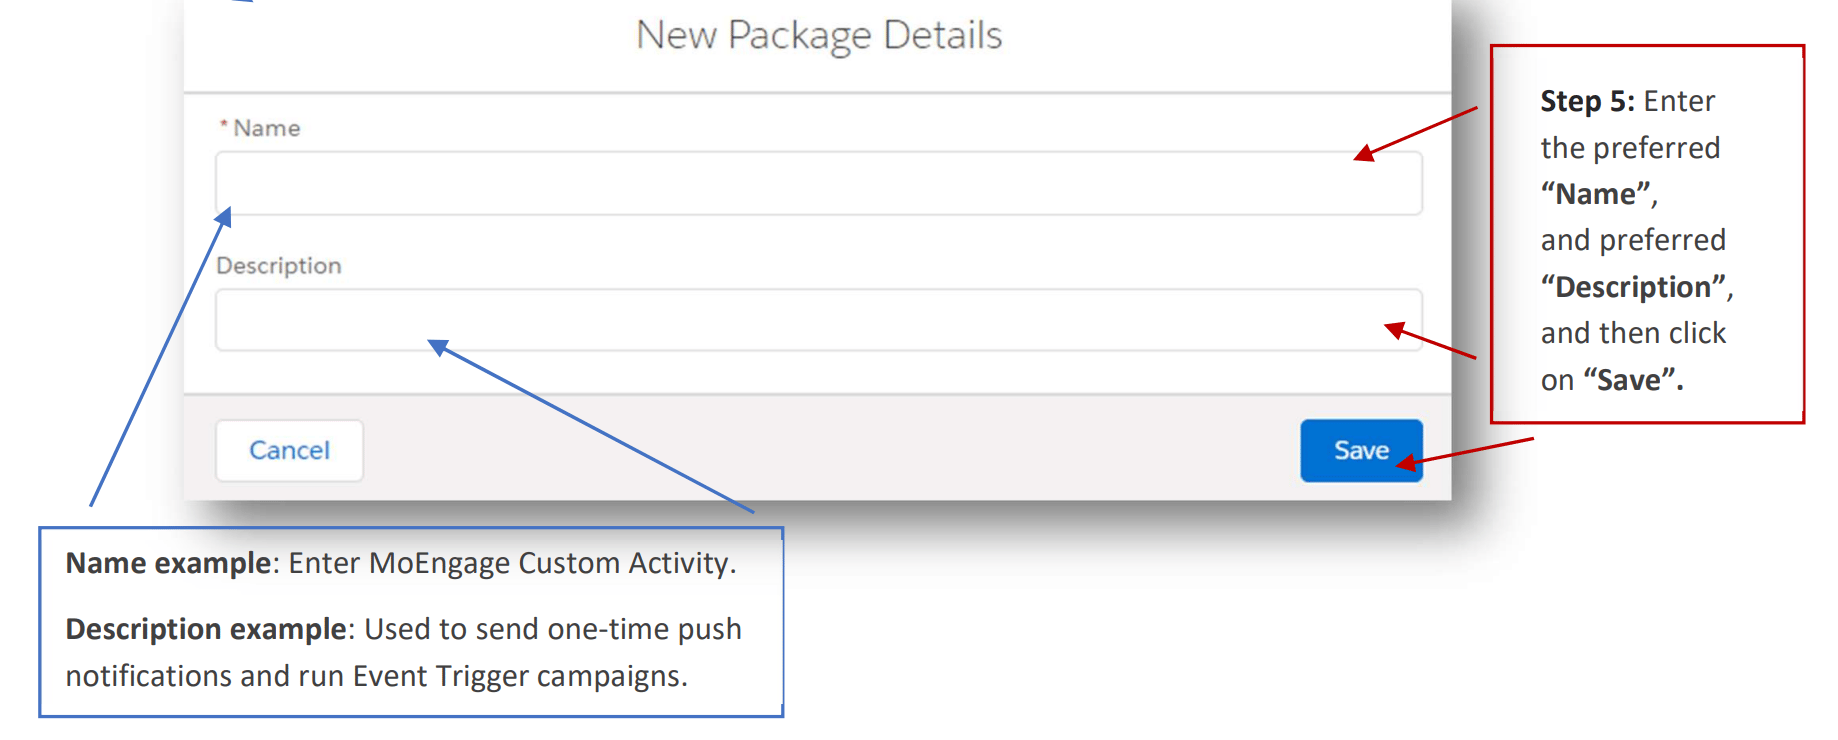 6. Add MoEngage Components.
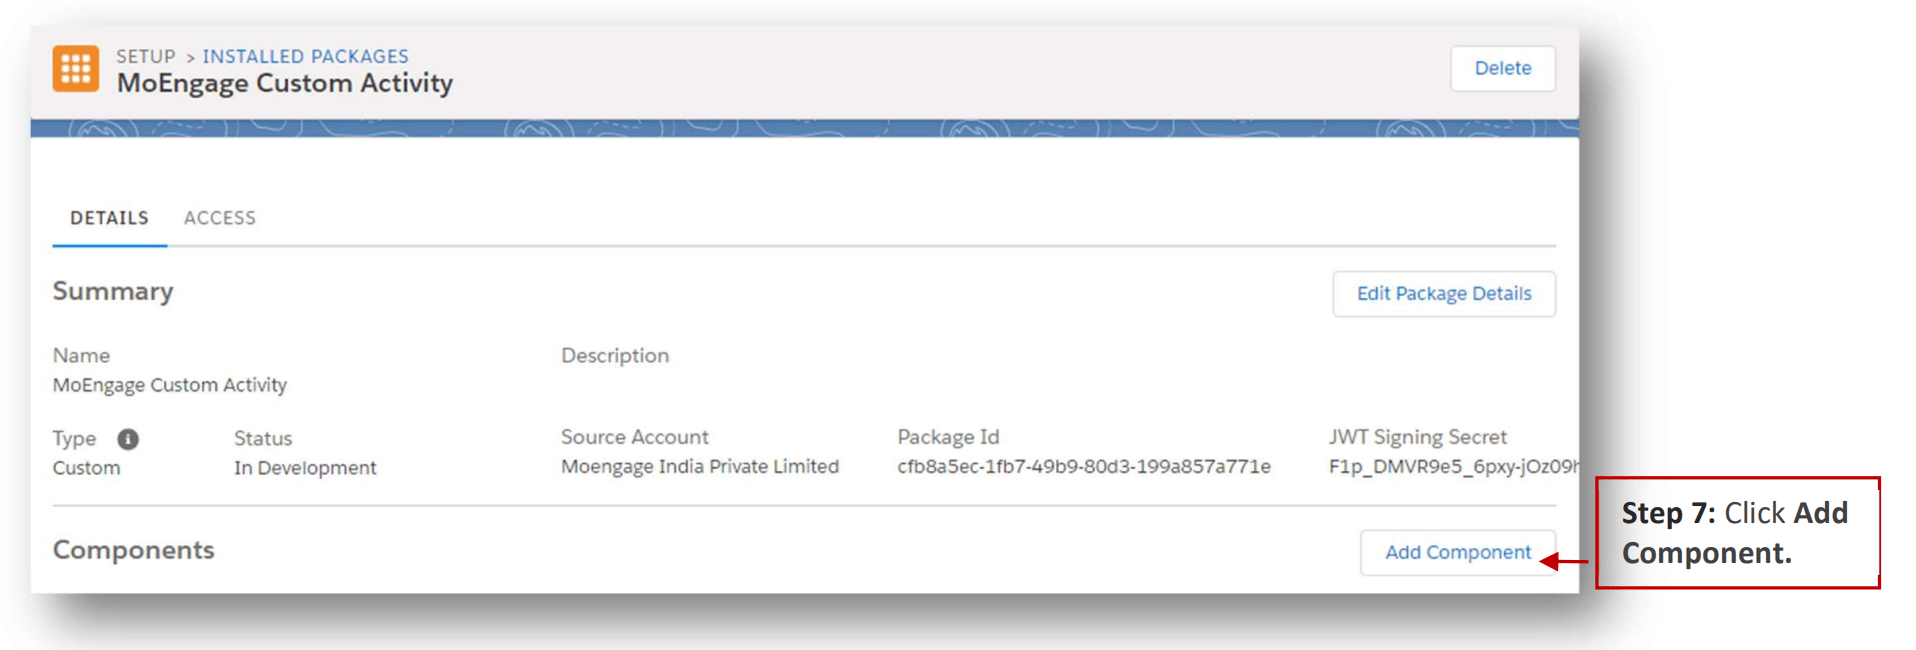
 7. Click Add Component.
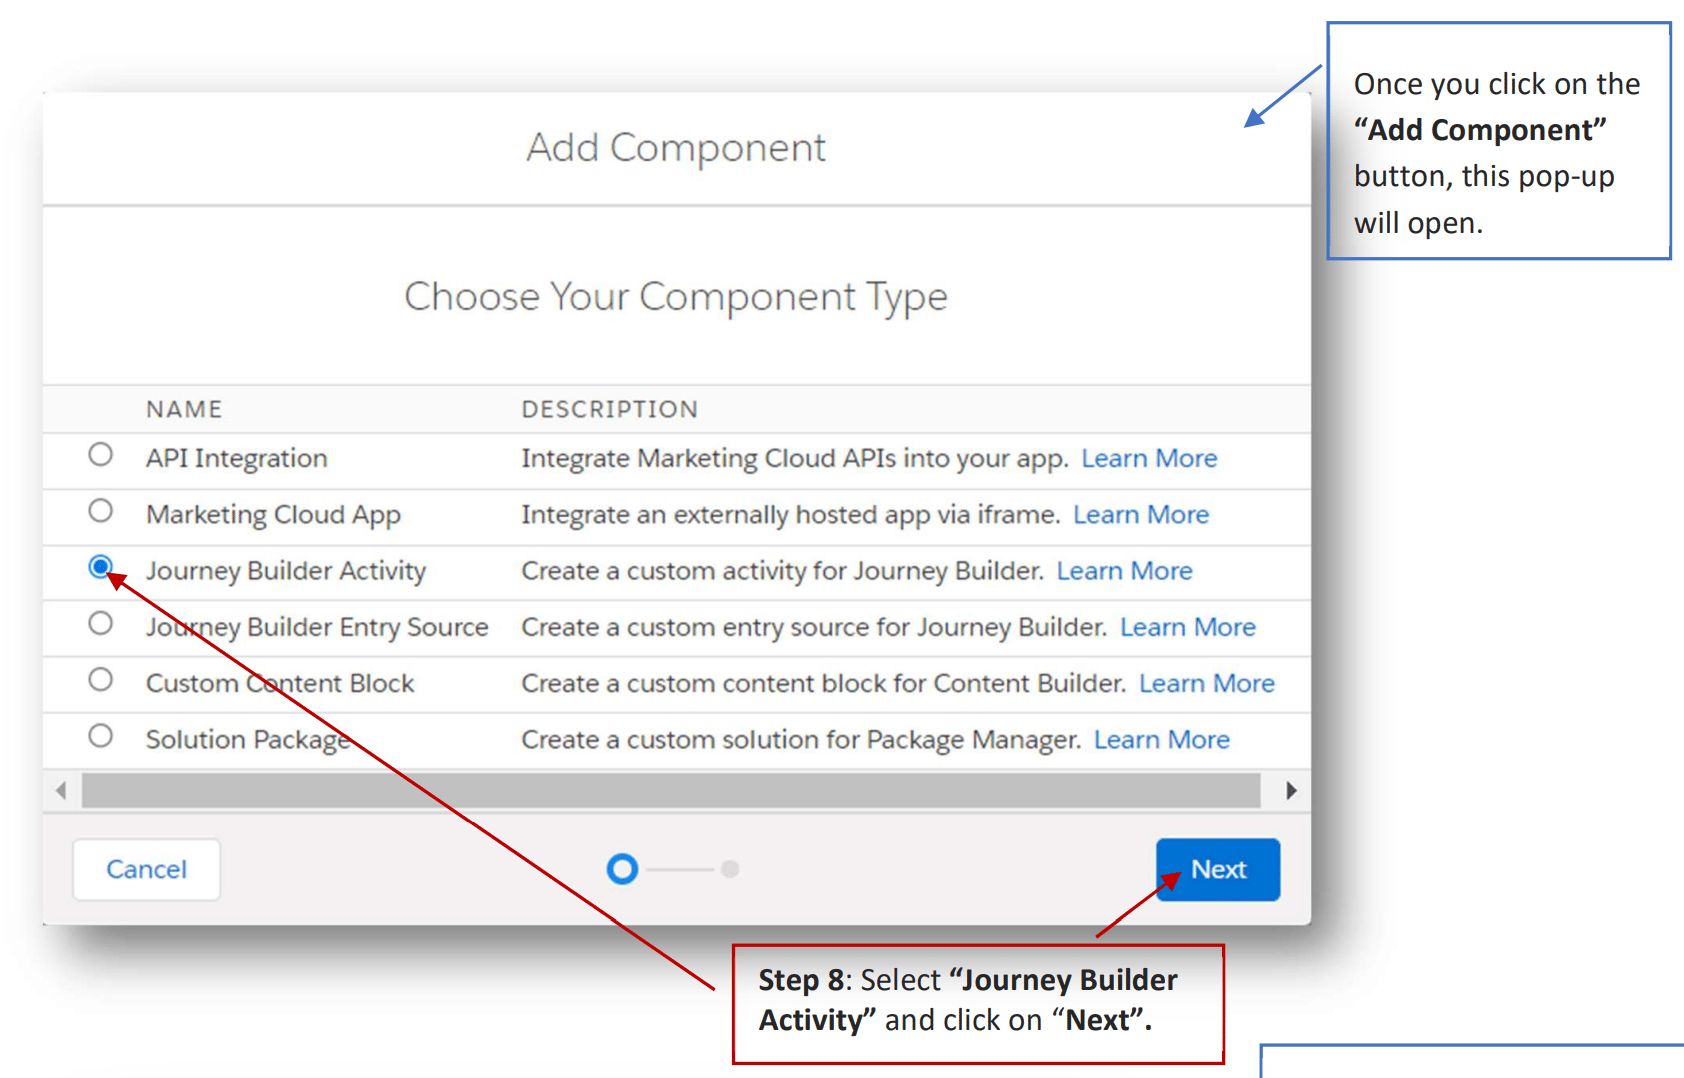
 8. Select "Journey Builder Activity" and click on "Next".
 9. Click Save.
10. Repeat the same steps for MoEngage Event Destination.
9. Click Save.
10. Repeat the same steps for MoEngage Event Destination.
 ## Step 2: Set up the Cloud Page and the Data Extension
You need to set up a cloud page along with a data extension to capture the MoEngage workspace details. These can then be used while configuring a MoEngage destination in Journey Builder:
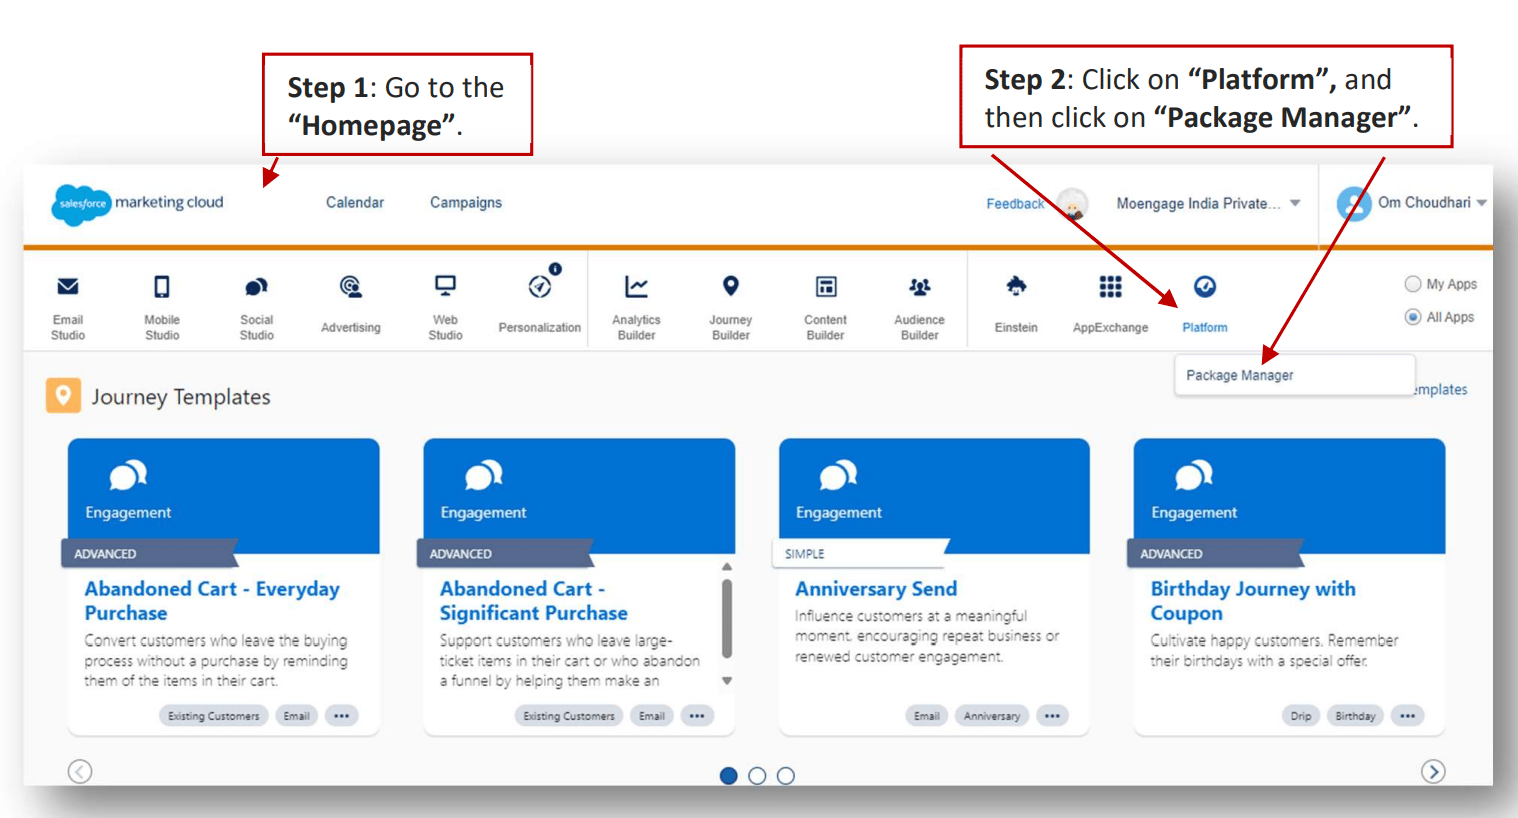
1. Navigate to the SFMC Home page.
2. Click "Platform" > "Package Manager".
## Step 2: Set up the Cloud Page and the Data Extension
You need to set up a cloud page along with a data extension to capture the MoEngage workspace details. These can then be used while configuring a MoEngage destination in Journey Builder:
1. Navigate to the SFMC Home page.
2. Click "Platform" > "Package Manager".
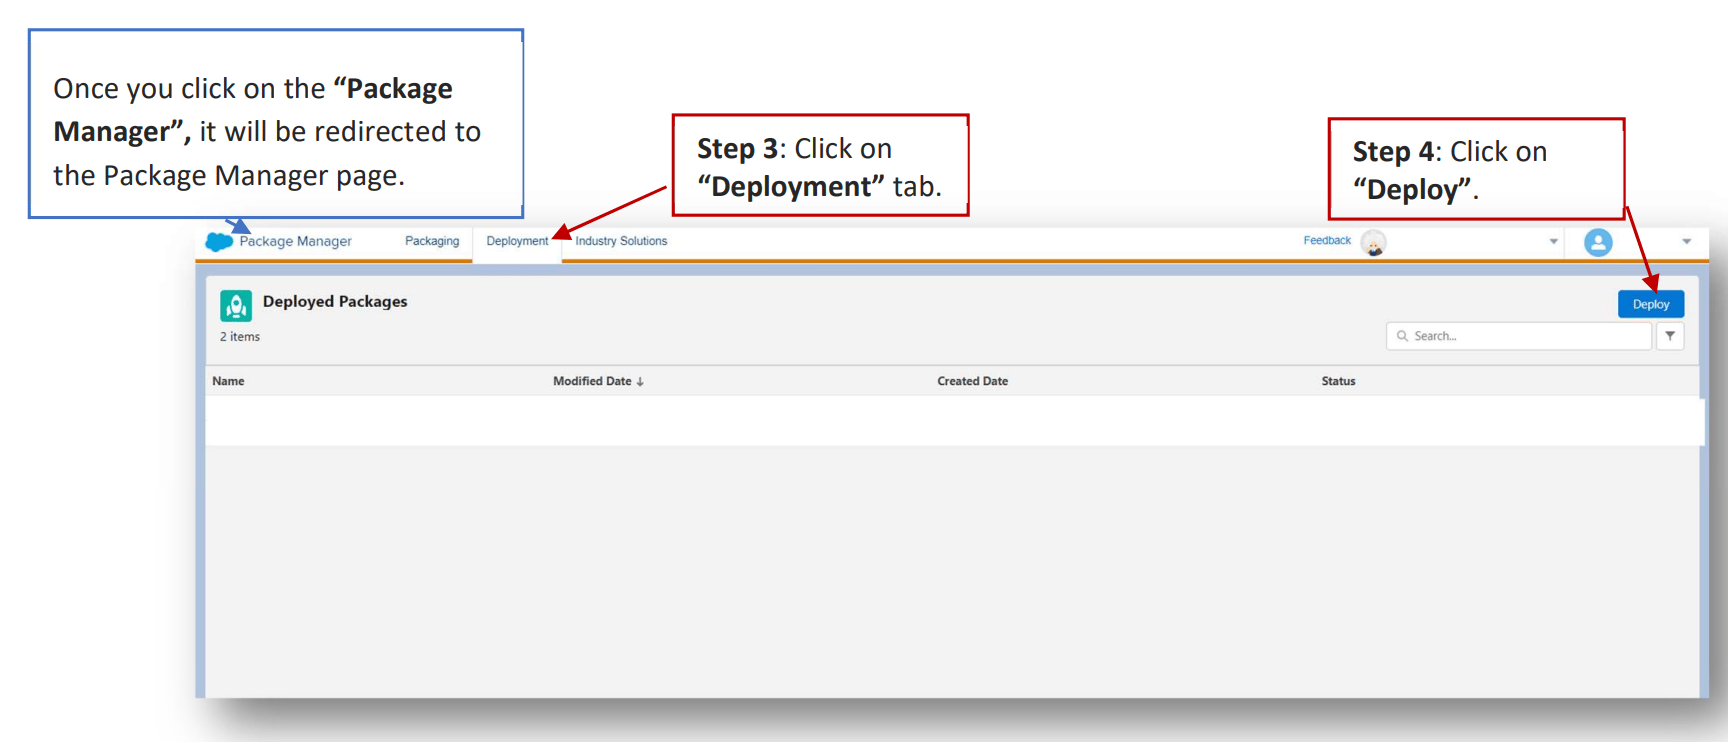
 Once you click on the "Package Manager", it will be redirected to the Package Manager page.
3. Click on the "Deployment" tab.
4. Click "Deploy".
Once you click on the "Package Manager", it will be redirected to the Package Manager page.
3. Click on the "Deployment" tab.
4. Click "Deploy".
 5. Upload the MoEngage solution package [JSON file](https://partners.moengage.com/hc/en-us/article_attachments/45740967830932).
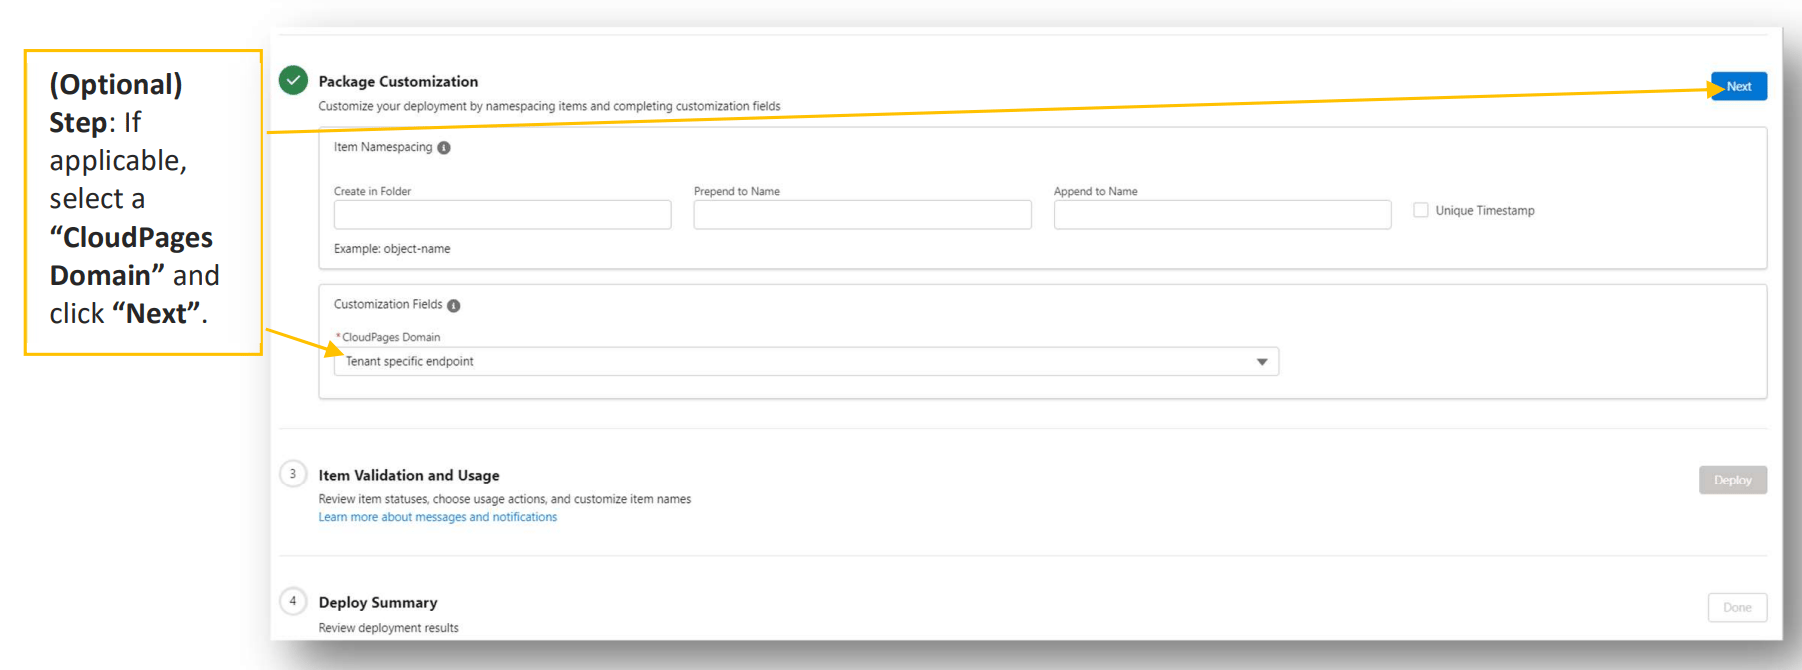
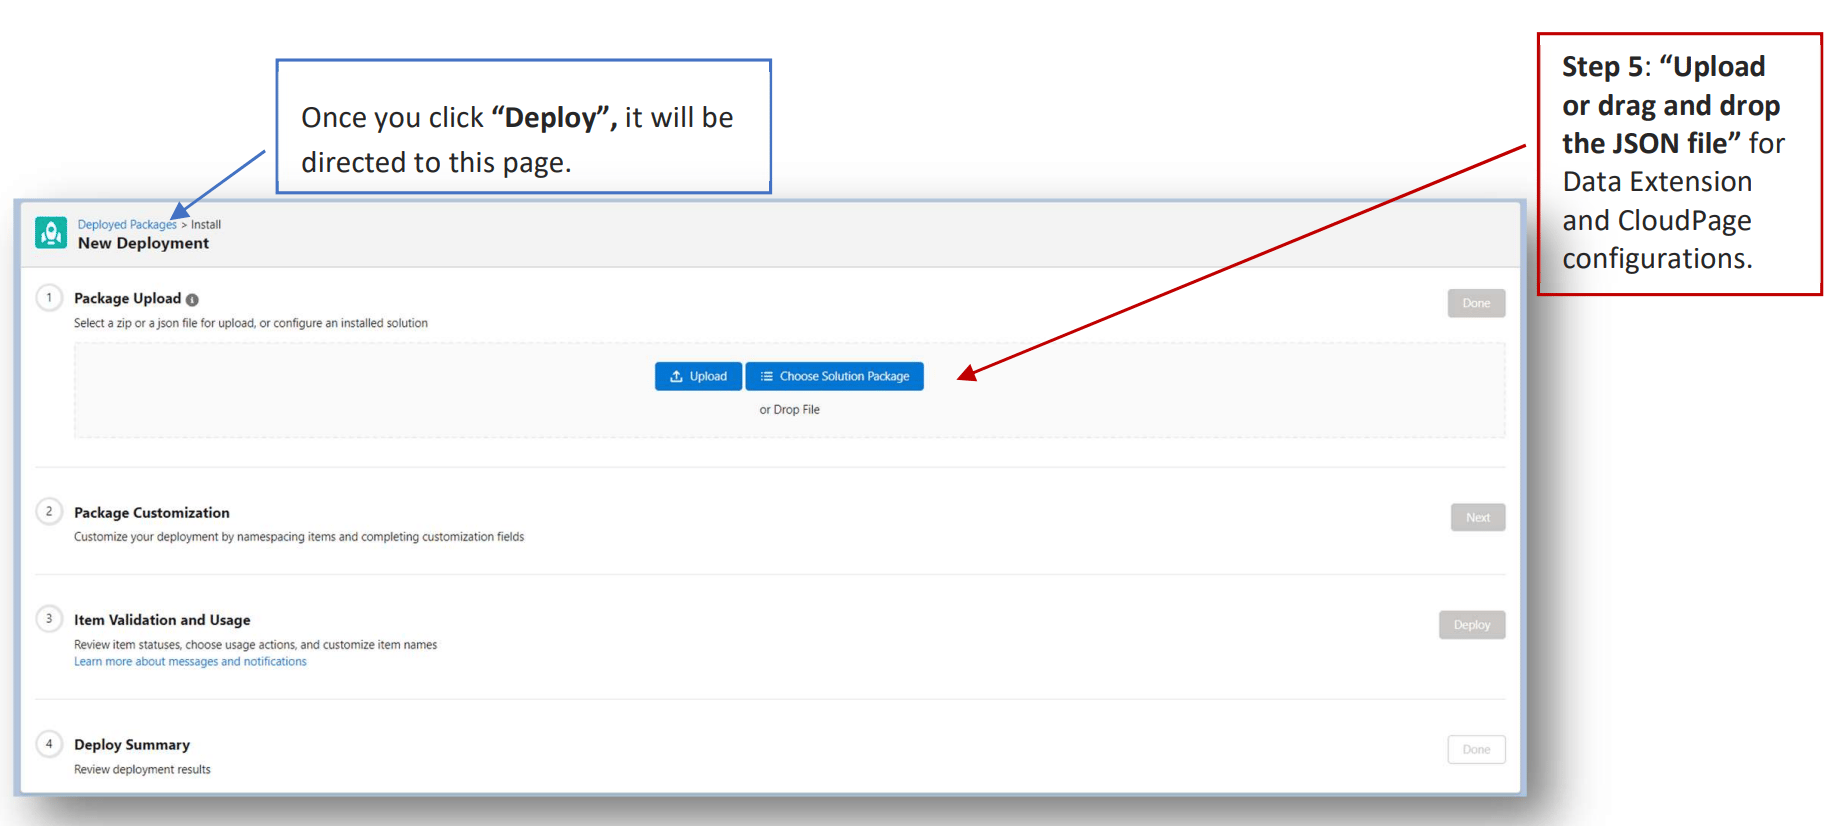 \[Optional] If applicable, select a "CloudPages Domain" and click "Next".
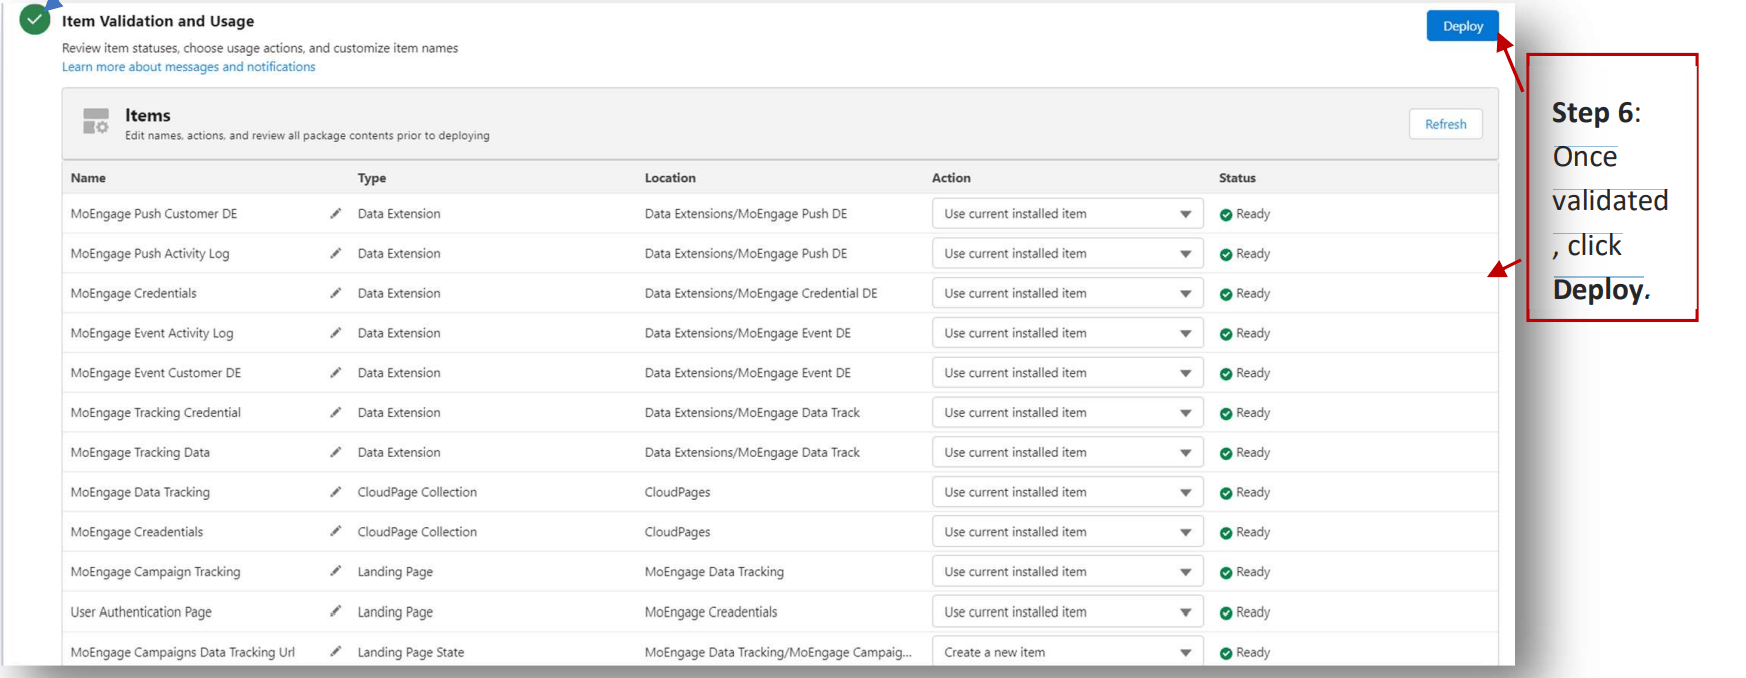
 6. The system will validate the setup and check for any issues. Once validated, click Deploy.
 ### Publish Data Extensions and CloudPages
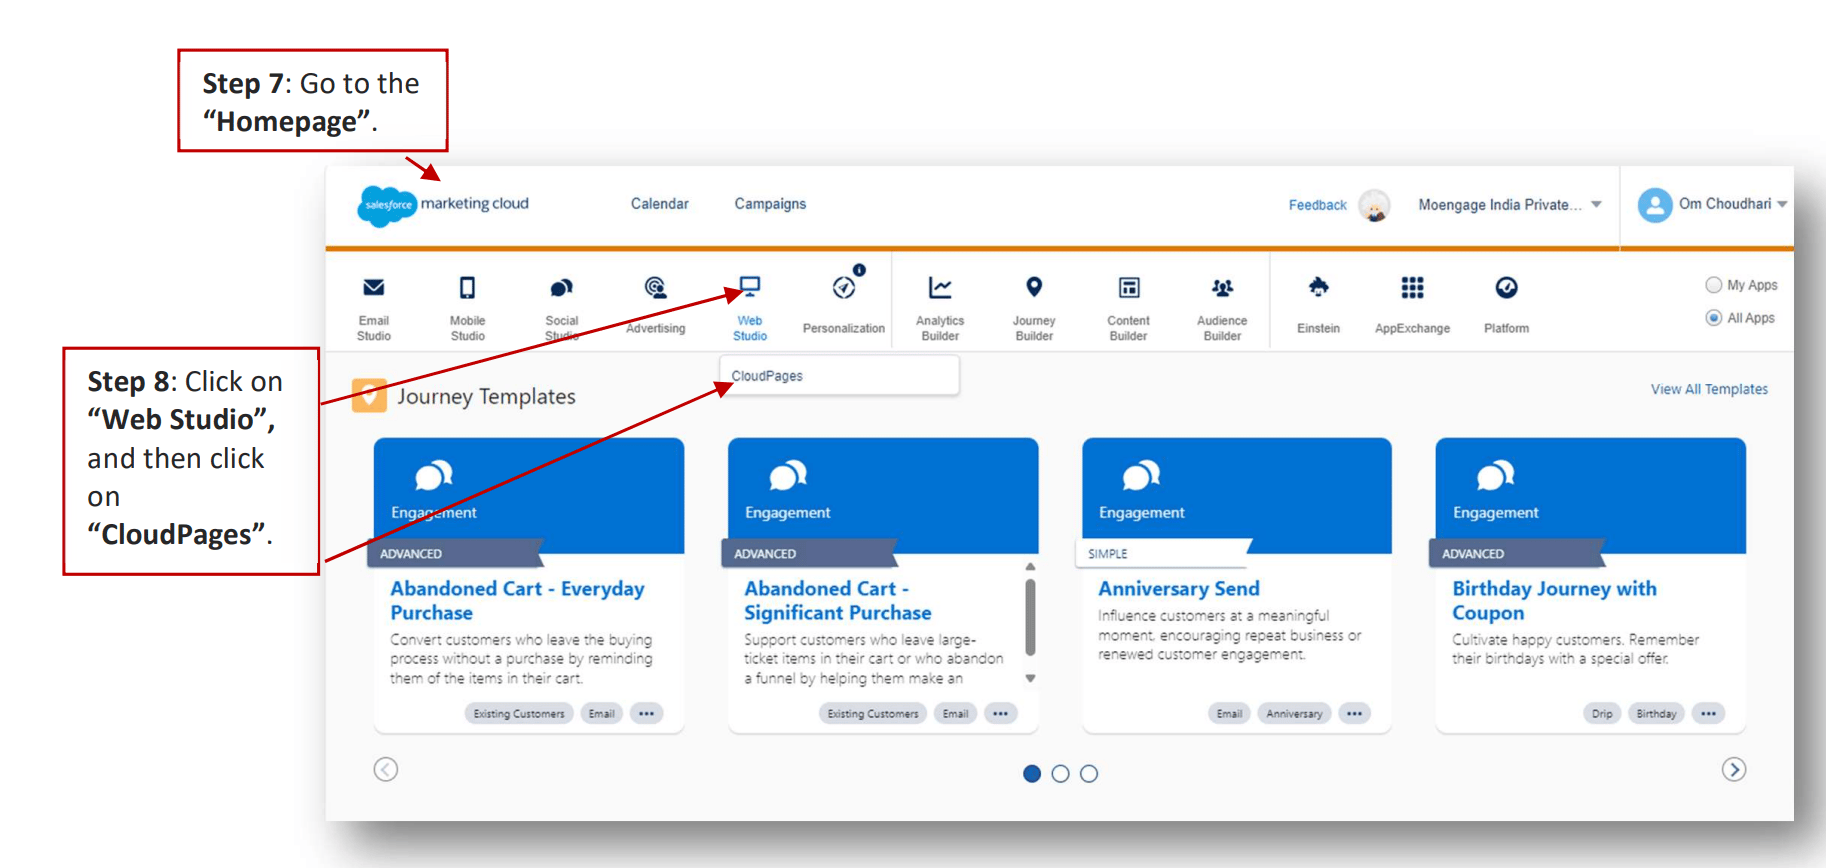
7. Go to the "Homepage".
8. Click on "Web Studio", and then click on "CloudPages".
### Publish Data Extensions and CloudPages
7. Go to the "Homepage".
8. Click on "Web Studio", and then click on "CloudPages".
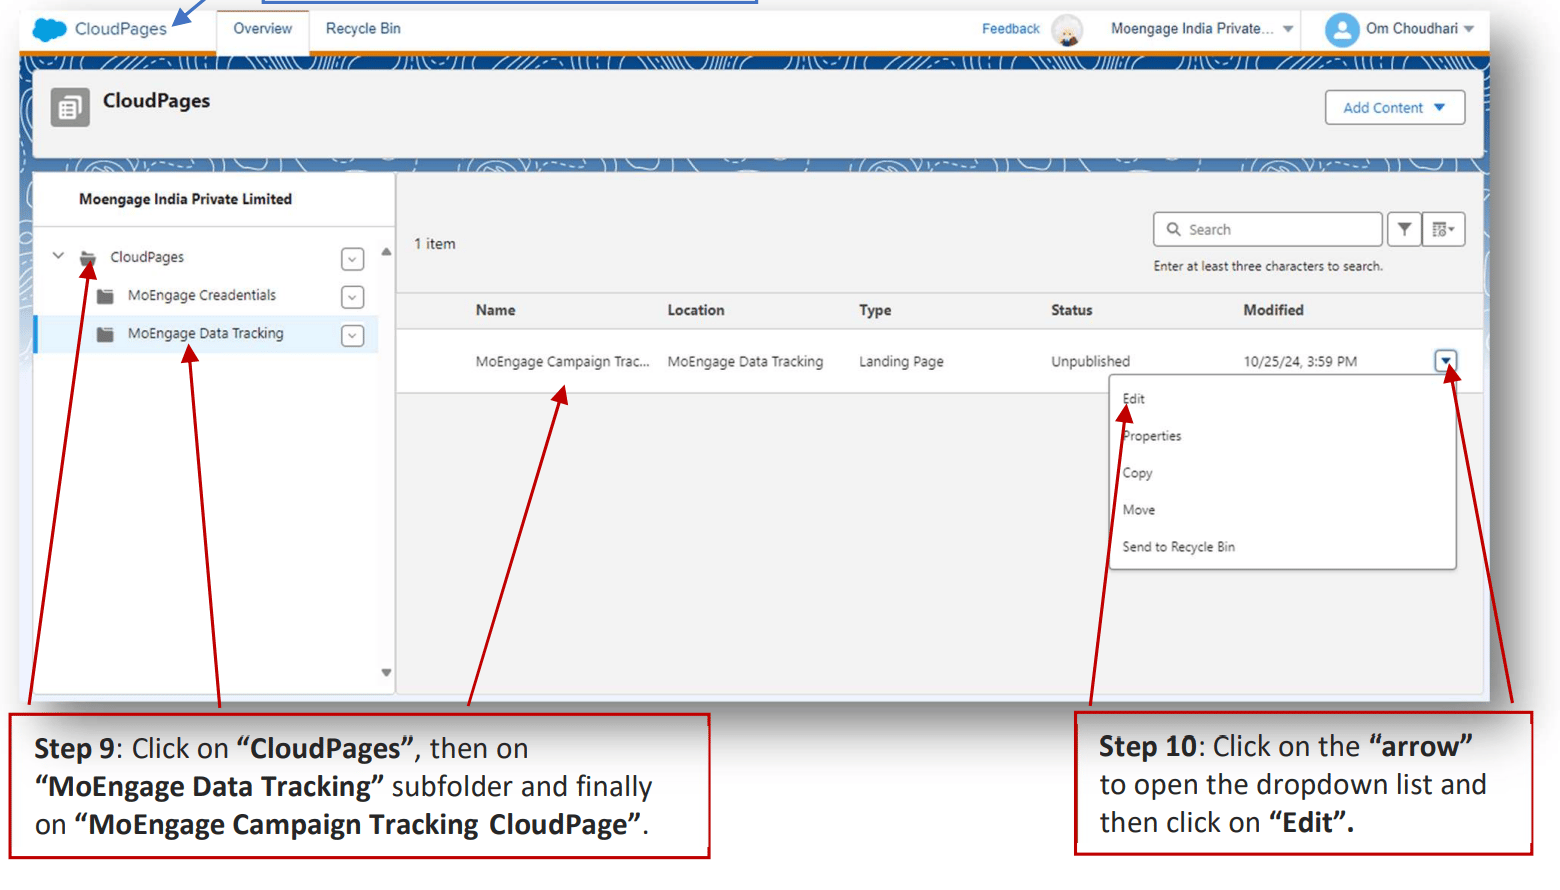
 9. Once you click "CloudPages", it will be directed to this page. Click on "CloudPages", then on "MoEngage Data Tracking" subfolder, and finally on "MoEngage Campaign Tracking CloudPage".
10. Click on the "arrow" to open the dropdown list and then click on "Edit".
9. Once you click "CloudPages", it will be directed to this page. Click on "CloudPages", then on "MoEngage Data Tracking" subfolder, and finally on "MoEngage Campaign Tracking CloudPage".
10. Click on the "arrow" to open the dropdown list and then click on "Edit".
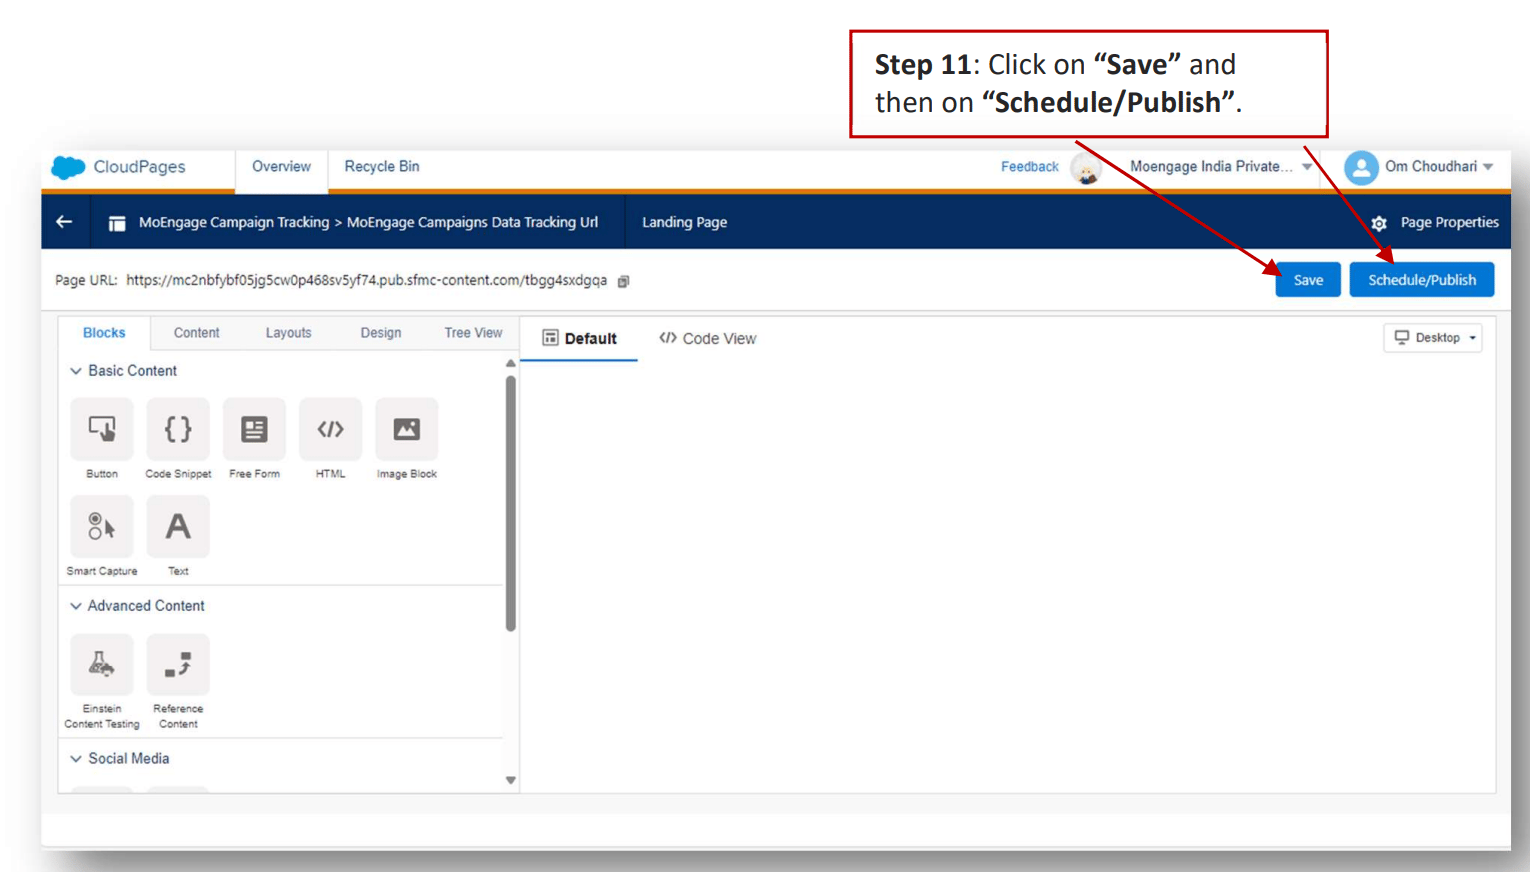
 11. Click on "Save" and then on "Schedule/Publish".
 12. Return to the "CloudPages" page, click on "MoEngage Credentials" subfolder and then on "User Authentication Page".
13. Click on the "arrow" to open the dropdown list and then click on "Edit".
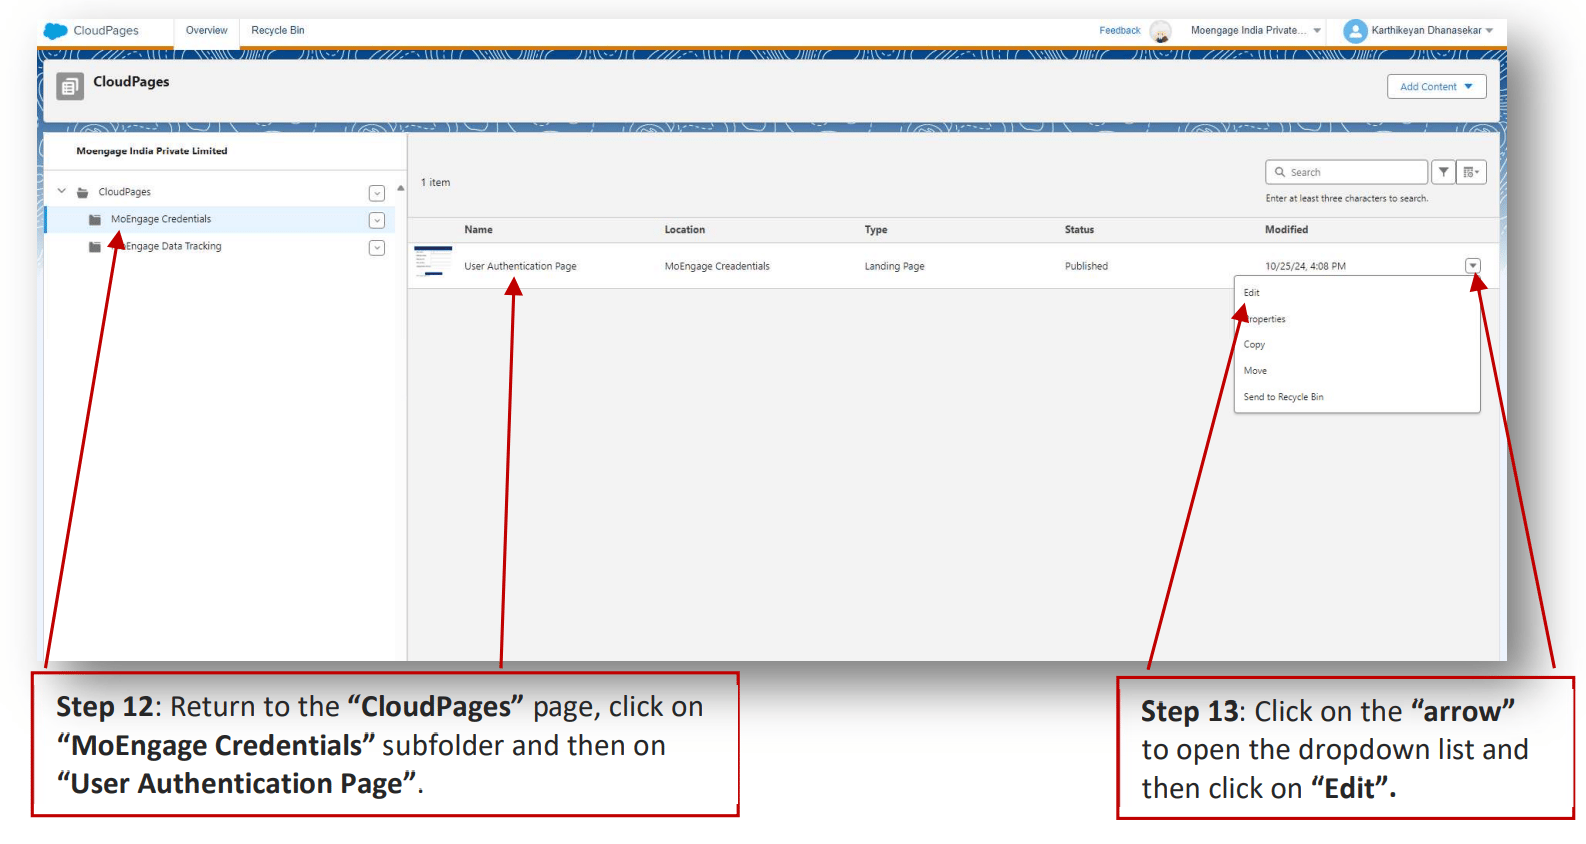
12. Return to the "CloudPages" page, click on "MoEngage Credentials" subfolder and then on "User Authentication Page".
13. Click on the "arrow" to open the dropdown list and then click on "Edit".
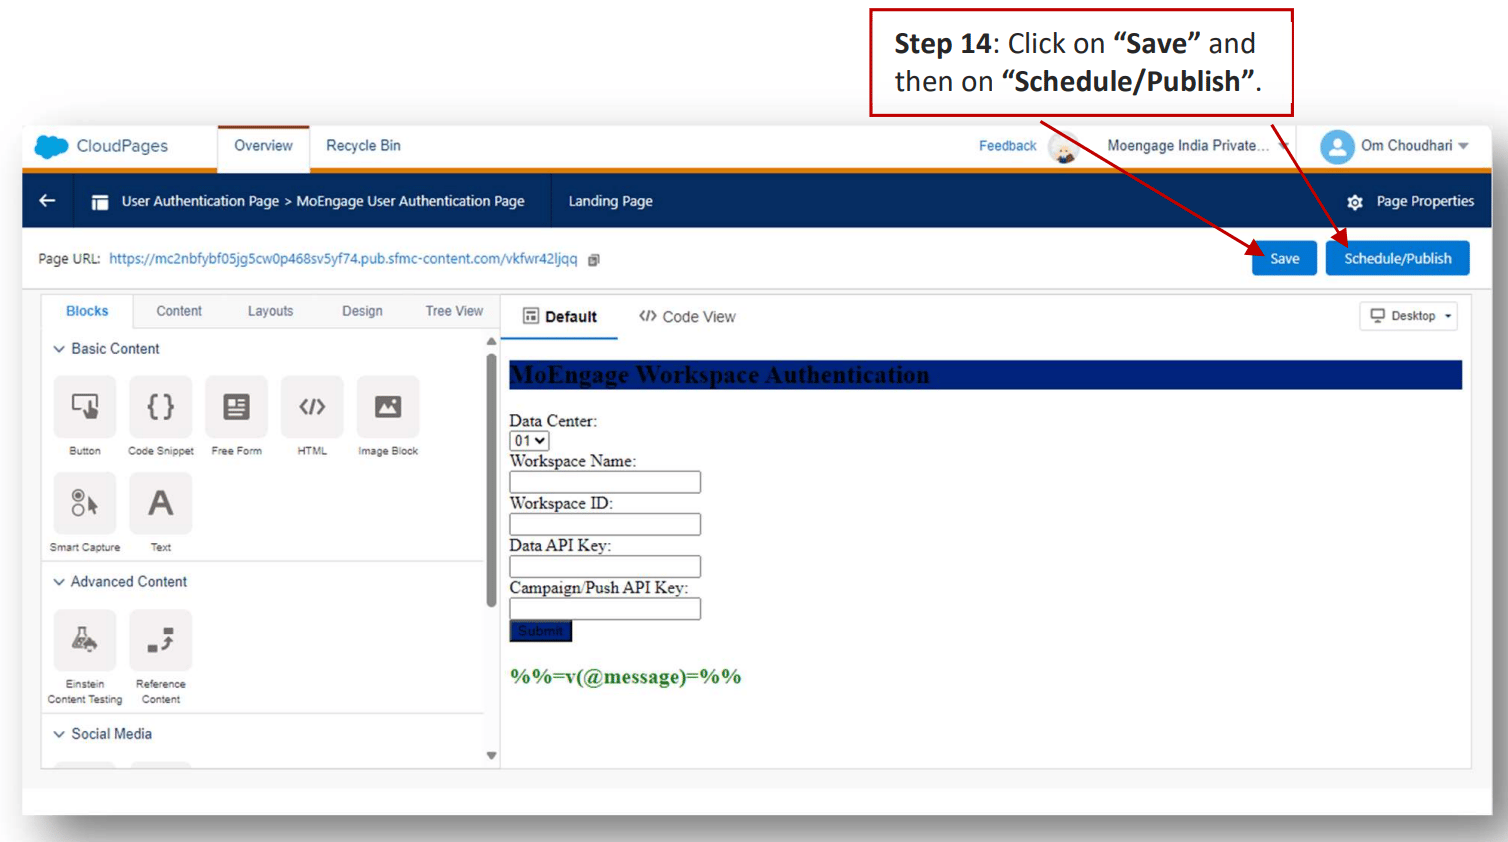
 14. Click on "Save" and then on "Schedule/Publish".
 ## Verify Data Extension and external keys
Ensure the following Data Extensions (DEs) are properly named and configured:
### A. MoEngage Tracking Data
It stores campaign tracking information.
1. Go to the "Homepage".
2. Click on "Audience Builder", and then click on "Contact Builder".
## Verify Data Extension and external keys
Ensure the following Data Extensions (DEs) are properly named and configured:
### A. MoEngage Tracking Data
It stores campaign tracking information.
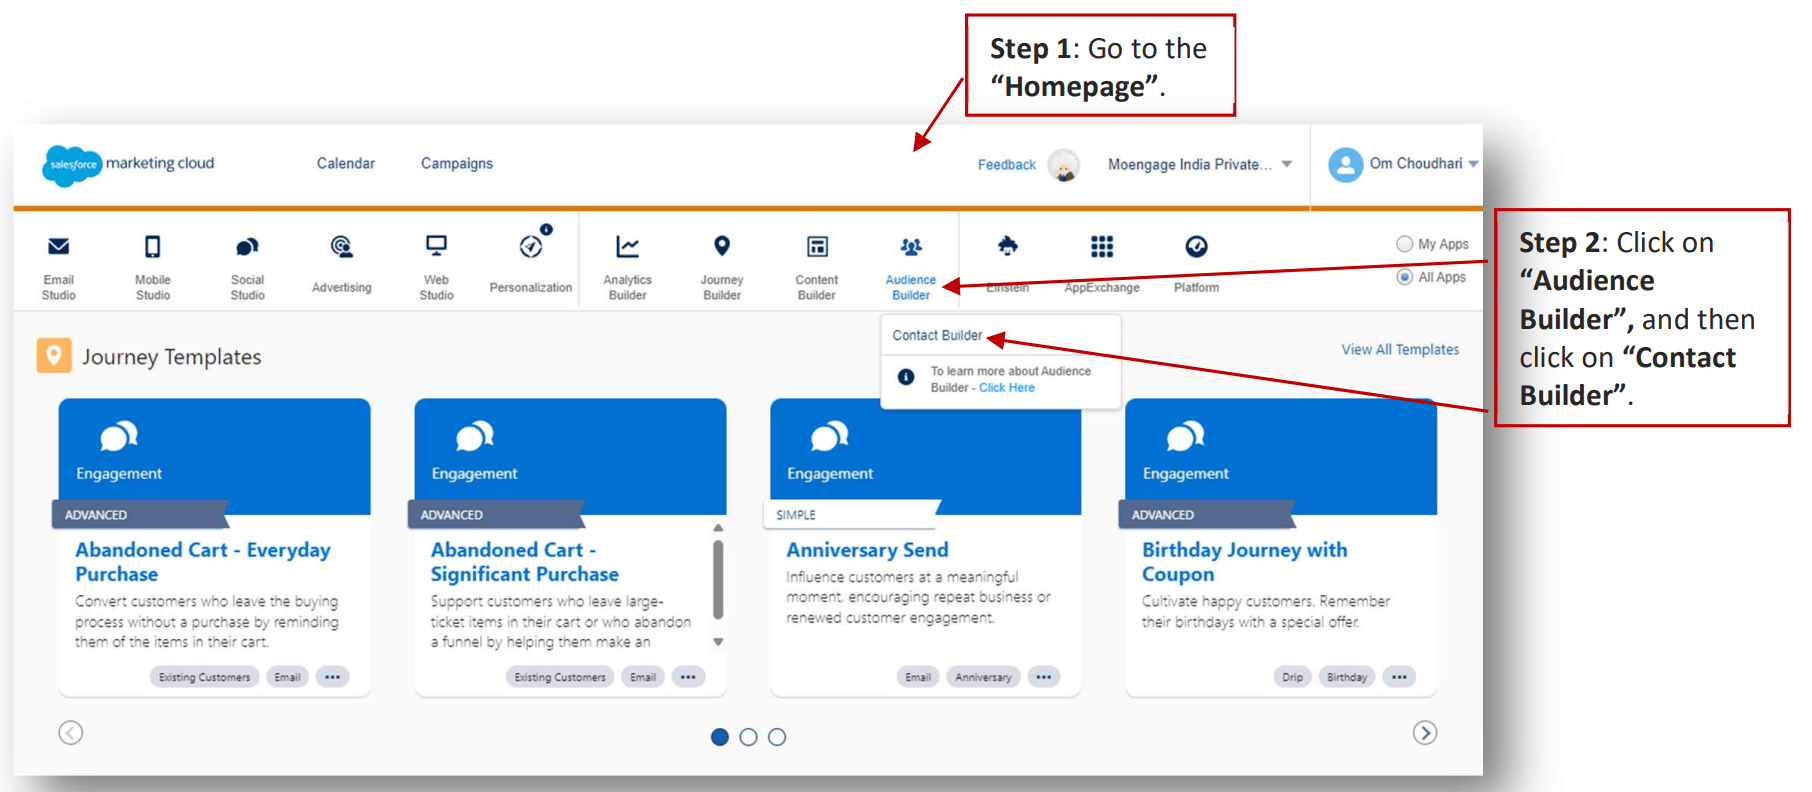
1. Go to the "Homepage".
2. Click on "Audience Builder", and then click on "Contact Builder".
 3. Select "Data Extensions" tab.
4. Click on "Data Extensions" folder, and then click on "MoEngage Data Track" subfolder.
5. Select "MoEngage Tracking data" extension.
3. Select "Data Extensions" tab.
4. Click on "Data Extensions" folder, and then click on "MoEngage Data Track" subfolder.
5. Select "MoEngage Tracking data" extension.
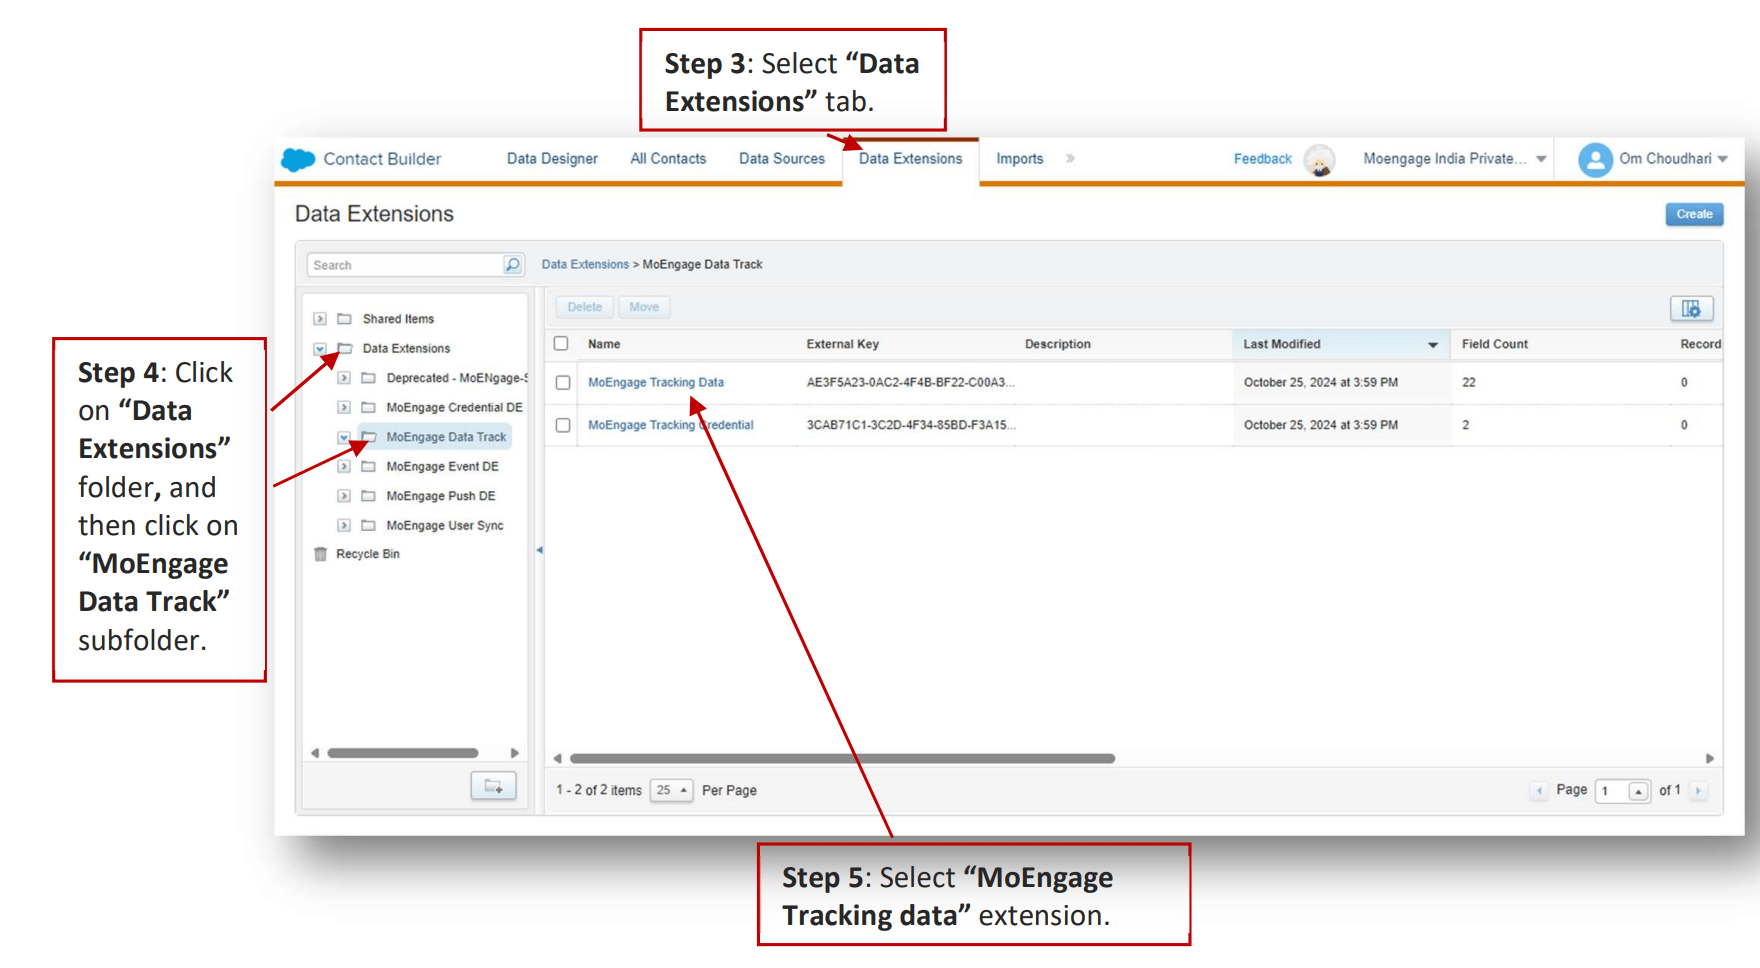 Here you can find the "External Key". Please ensure it is accurate. \[Optional] If external key needs to be entered or changed, click on "External Key" input field, paste or enter the external key and click on "Done".
### B. MoEngage Credentials
It stores the credentials for the Data Tracking CloudPage:
1. Go to the "Homepage".
2. Click on "Audience Builder", and then click on "Contact Builder".
Here you can find the "External Key". Please ensure it is accurate. \[Optional] If external key needs to be entered or changed, click on "External Key" input field, paste or enter the external key and click on "Done".
### B. MoEngage Credentials
It stores the credentials for the Data Tracking CloudPage:
1. Go to the "Homepage".
2. Click on "Audience Builder", and then click on "Contact Builder".
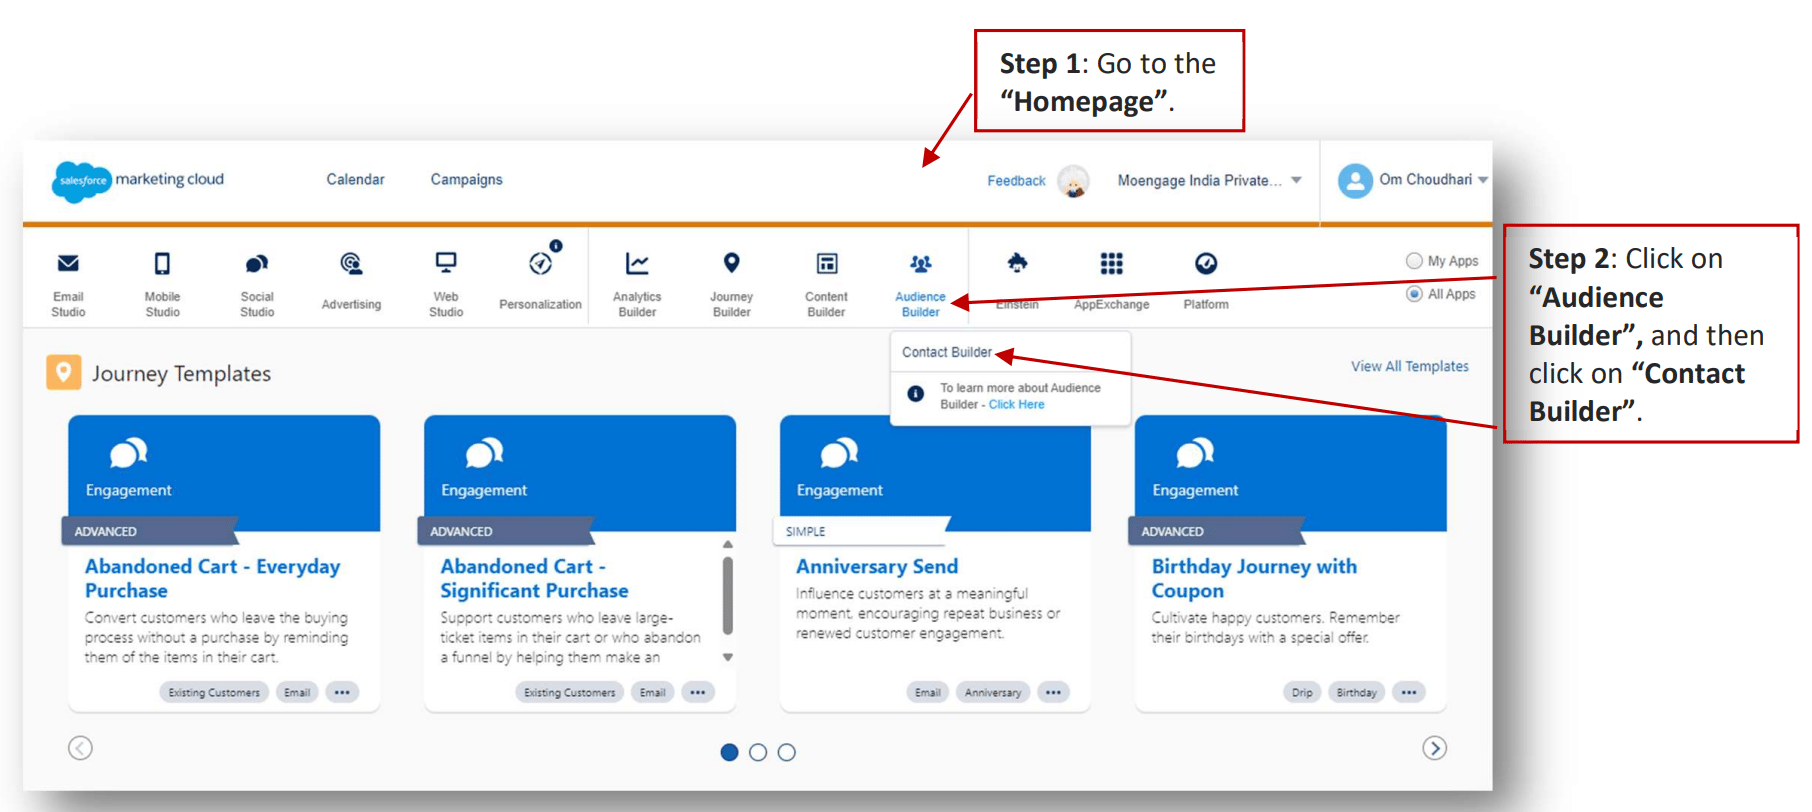 3. Select "Data Extensions" tab.
4. Click on "Data Extensions" folder, and then click on "MoEngage Data Track" subfolder.
5. Select "MoEngage Tracking Credential".
3. Select "Data Extensions" tab.
4. Click on "Data Extensions" folder, and then click on "MoEngage Data Track" subfolder.
5. Select "MoEngage Tracking Credential".
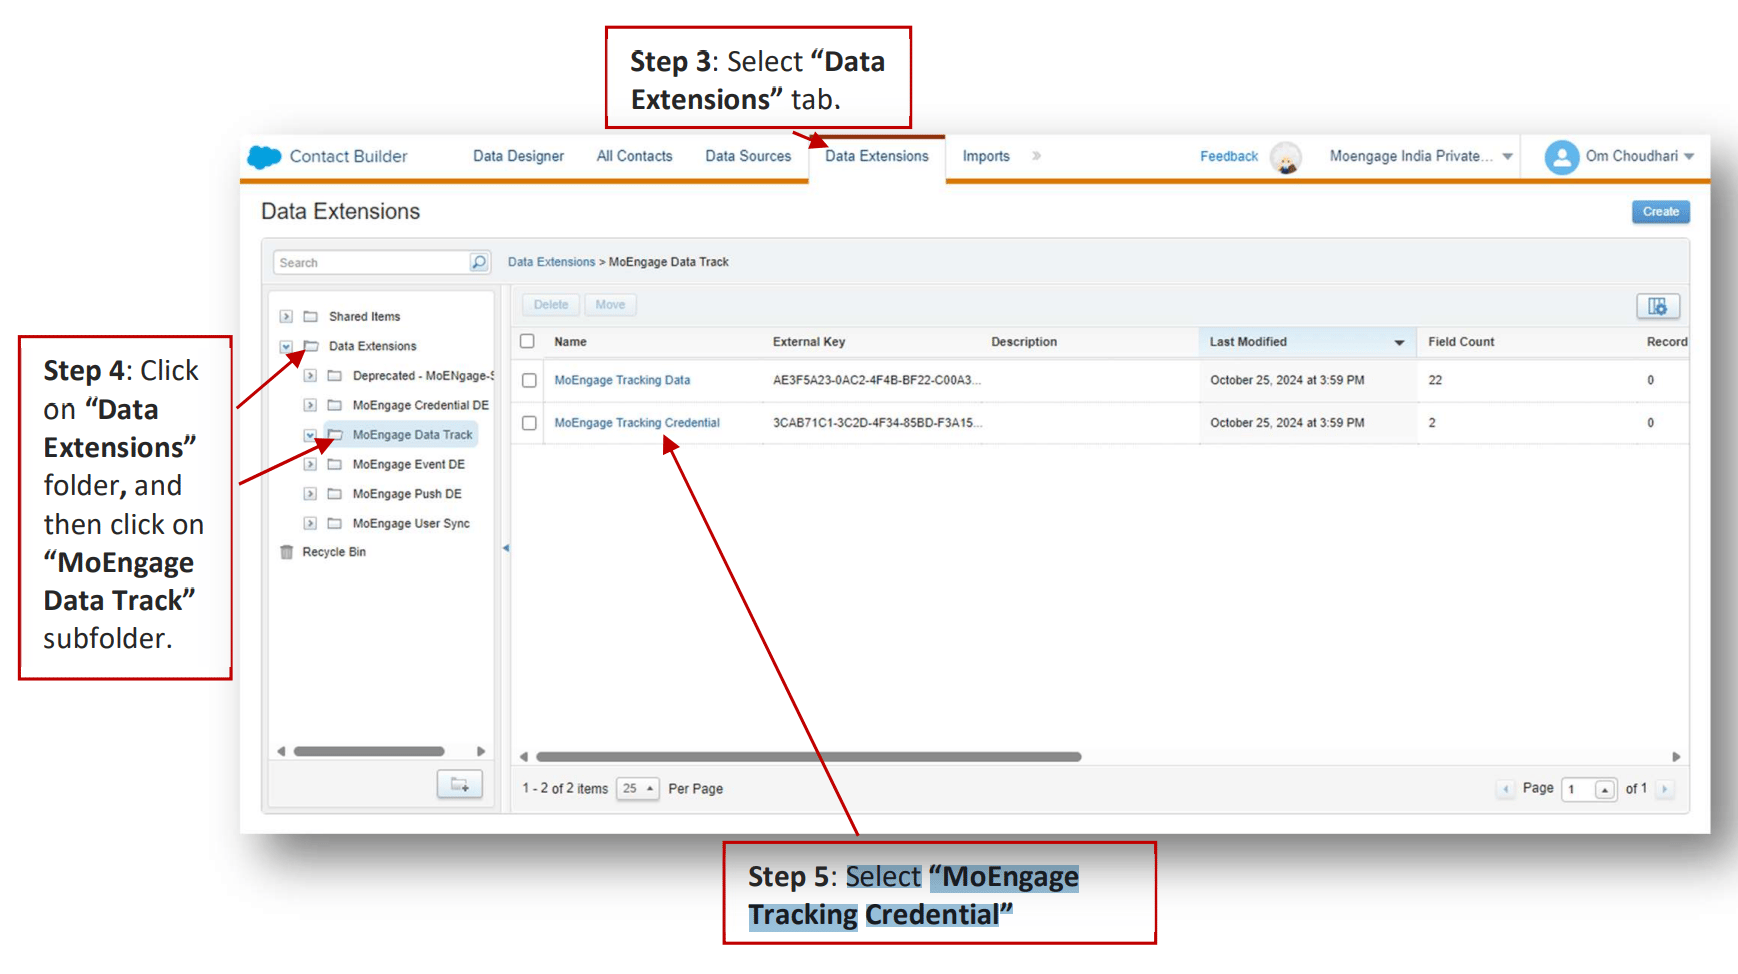 Here you can find the "External Key". Please ensure it is accurate. \[Optional] If external key needs to be entered or changed, click on "External Key" input field, paste or enter the external key and click on "Done".
### C. MoEngage Event Activity Log
It logs Event Custom Activity information.
1. Go to the "Homepage".
2. Click on "Audience Builder", and then click on "Contact Builder".
Here you can find the "External Key". Please ensure it is accurate. \[Optional] If external key needs to be entered or changed, click on "External Key" input field, paste or enter the external key and click on "Done".
### C. MoEngage Event Activity Log
It logs Event Custom Activity information.
1. Go to the "Homepage".
2. Click on "Audience Builder", and then click on "Contact Builder".
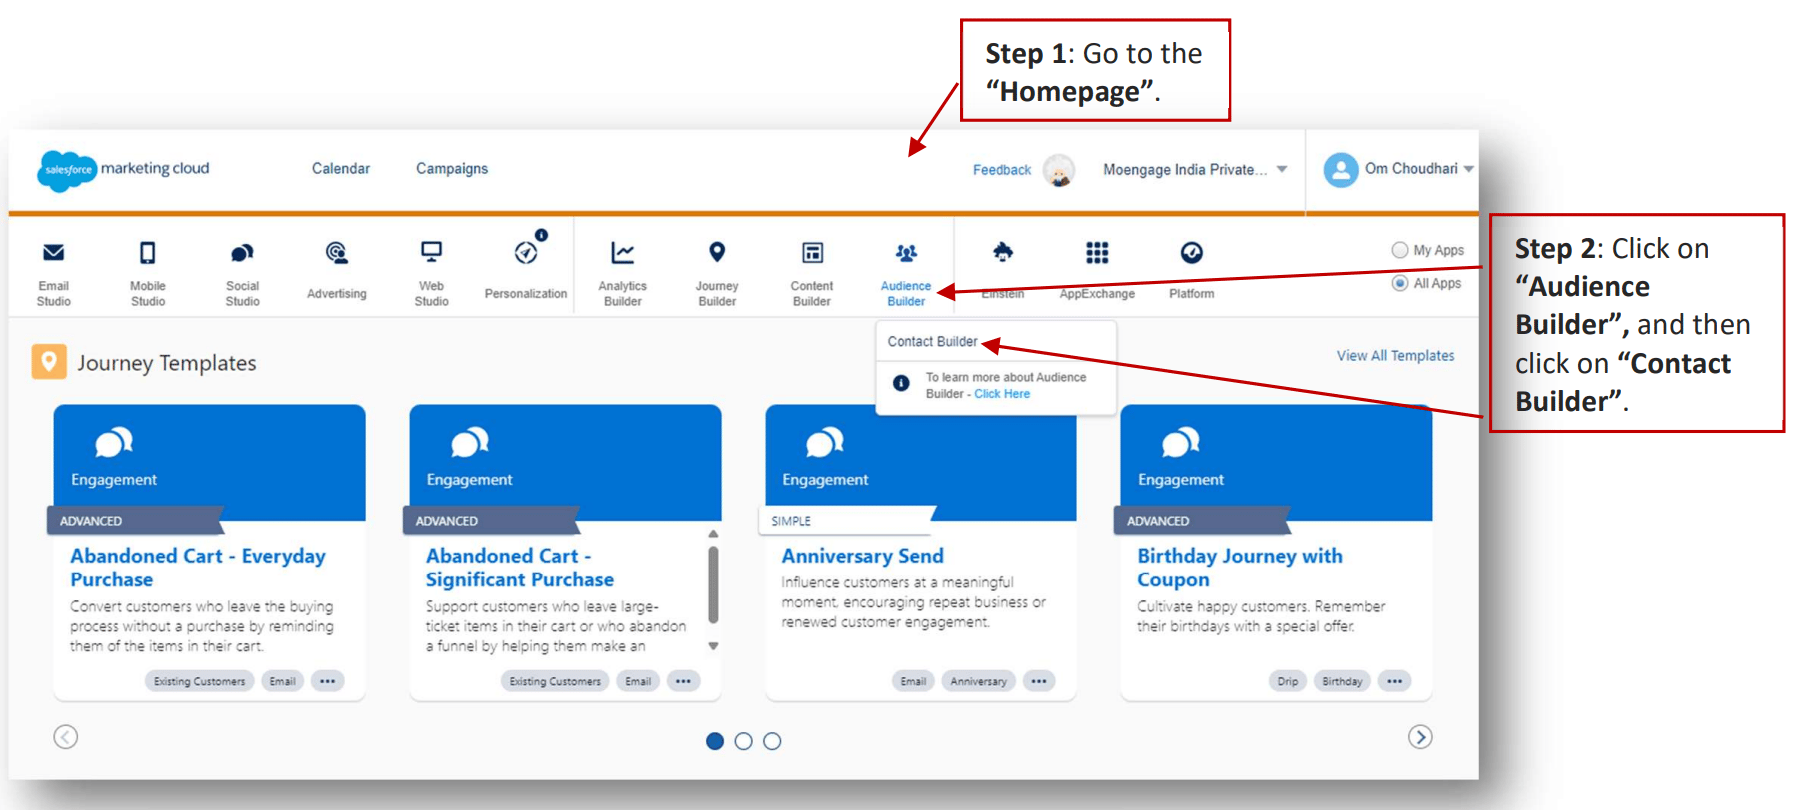 3. Select "Data Extensions" tab.
4. Click on "Data Extensions" folder, and then click on "MoEngage Event DE" subfolder.
5. Select "MoEngage Tracking Credential".
3. Select "Data Extensions" tab.
4. Click on "Data Extensions" folder, and then click on "MoEngage Event DE" subfolder.
5. Select "MoEngage Tracking Credential".
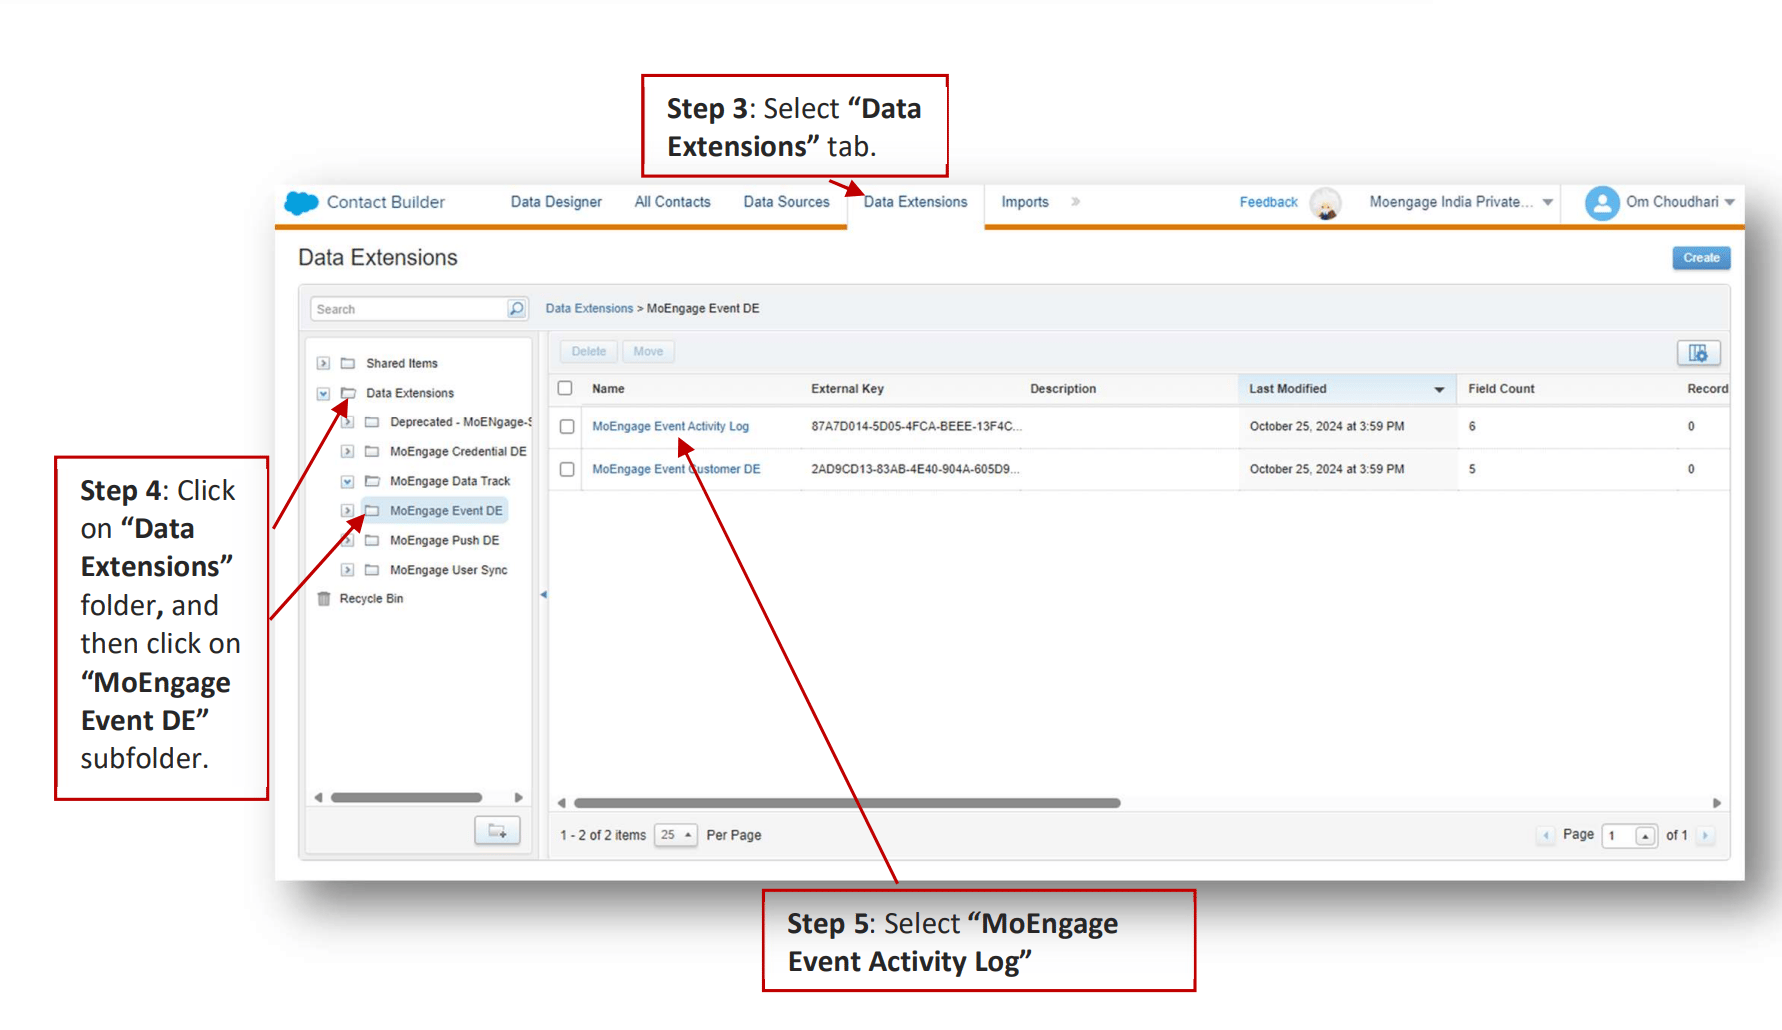 6. Select "MoEngage Event Activity Log".
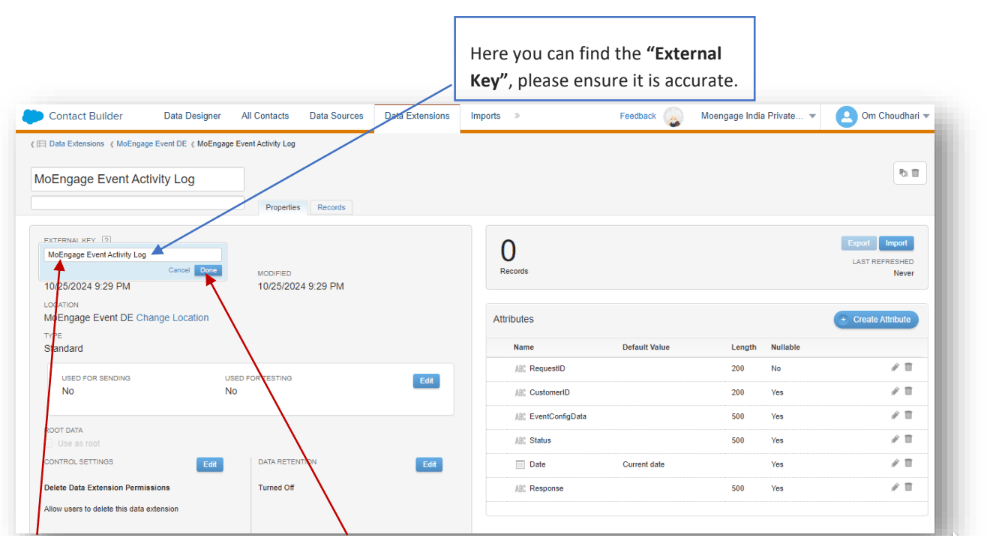
Here you can find the "External Key". Please ensure it is accurate. \[Optional] If external key needs to be entered or changed, click on "External Key" input field, paste or enter the external key and click on "Done".
6. Select "MoEngage Event Activity Log".
Here you can find the "External Key". Please ensure it is accurate. \[Optional] If external key needs to be entered or changed, click on "External Key" input field, paste or enter the external key and click on "Done".
 ### D. MoEngage Push Activity Log
It logs Push Custom Activity information.
1. Go to the "Homepage".
2. Click on "Audience Builder", and then click on "Contact Builder".
3. Select "Data Extensions" tab.
4. Click on "Data Extensions" folder, and then click on "MoEngage Push DE" subfolder.
5. Select "MoEngage Push Activity Log".
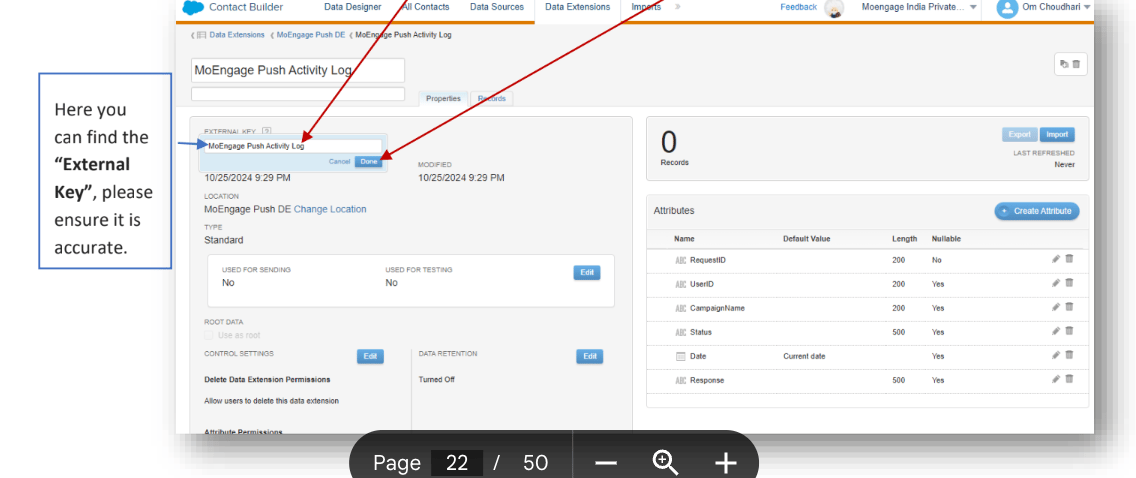
Here you can find the "External Key". Please ensure it is accurate. \[Optional] If external key needs to be entered or changed, click on "External Key" input field, paste or enter the external key and click on "Done".
### D. MoEngage Push Activity Log
It logs Push Custom Activity information.
1. Go to the "Homepage".
2. Click on "Audience Builder", and then click on "Contact Builder".
3. Select "Data Extensions" tab.
4. Click on "Data Extensions" folder, and then click on "MoEngage Push DE" subfolder.
5. Select "MoEngage Push Activity Log".
Here you can find the "External Key". Please ensure it is accurate. \[Optional] If external key needs to be entered or changed, click on "External Key" input field, paste or enter the external key and click on "Done".
 ## Configure Data Extension
### A. Configure Data Extensions
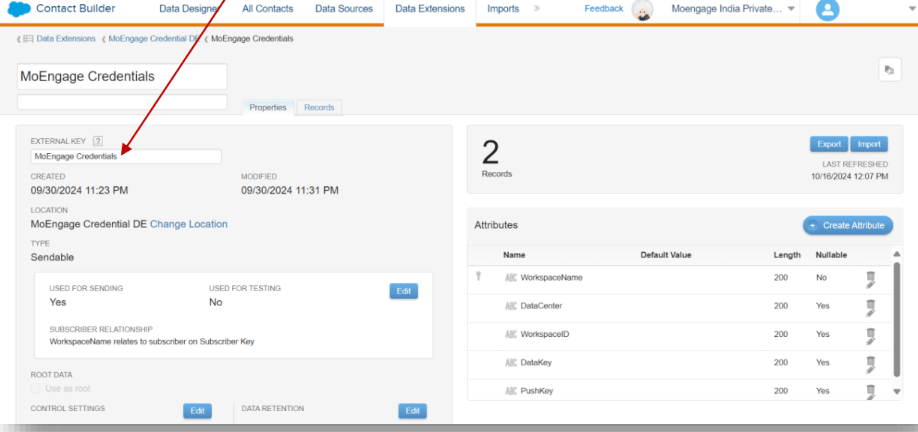
1. Change the external key of the credentials data extension from the solution package to "MoEngage Credentials".
## Configure Data Extension
### A. Configure Data Extensions
1. Change the external key of the credentials data extension from the solution package to "MoEngage Credentials".
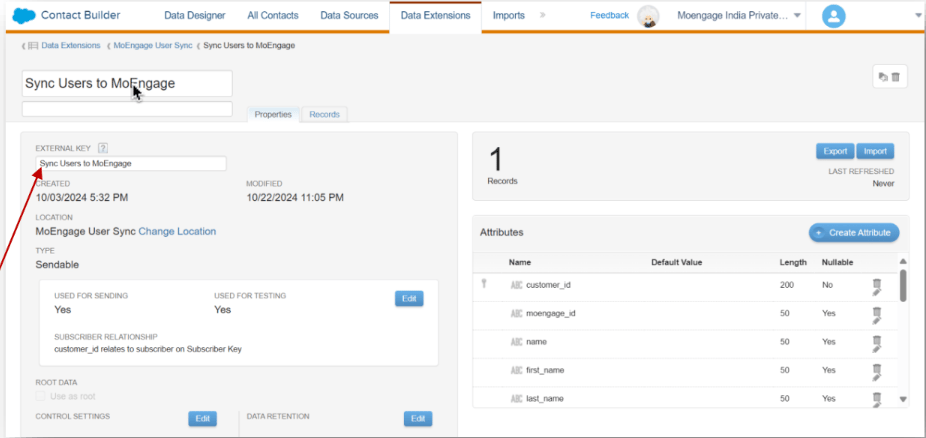
 2. Change the external key of the "Sync Users to MoEngage" data extension from the solution package to "Sync Users to MoEngage".
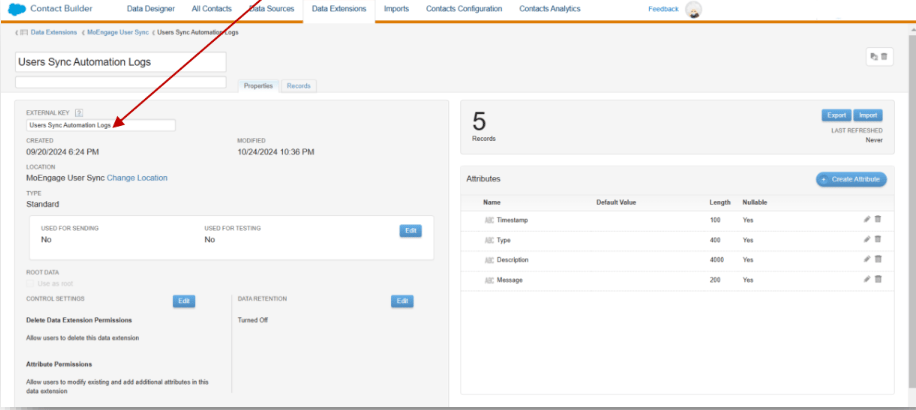
 3. Change the external key of the "User Sync Automation Logs" data extension from the solution package to "User Sync Automation Logs".
 ## Connect your MoEngage workspace
### A. Access the credentials cloud page
On your SFMC dashboard, perform the following steps:
1. Navigate to "Web Studio" > "CloudPages" > "MoEngage Credentials" subfolder. Finally click on "MoEngage Authentication Page". Click Edit.
2. Click on the "Page URL" to open the Authentication Page.
## Connect your MoEngage workspace
### A. Access the credentials cloud page
On your SFMC dashboard, perform the following steps:
1. Navigate to "Web Studio" > "CloudPages" > "MoEngage Credentials" subfolder. Finally click on "MoEngage Authentication Page". Click Edit.
2. Click on the "Page URL" to open the Authentication Page.
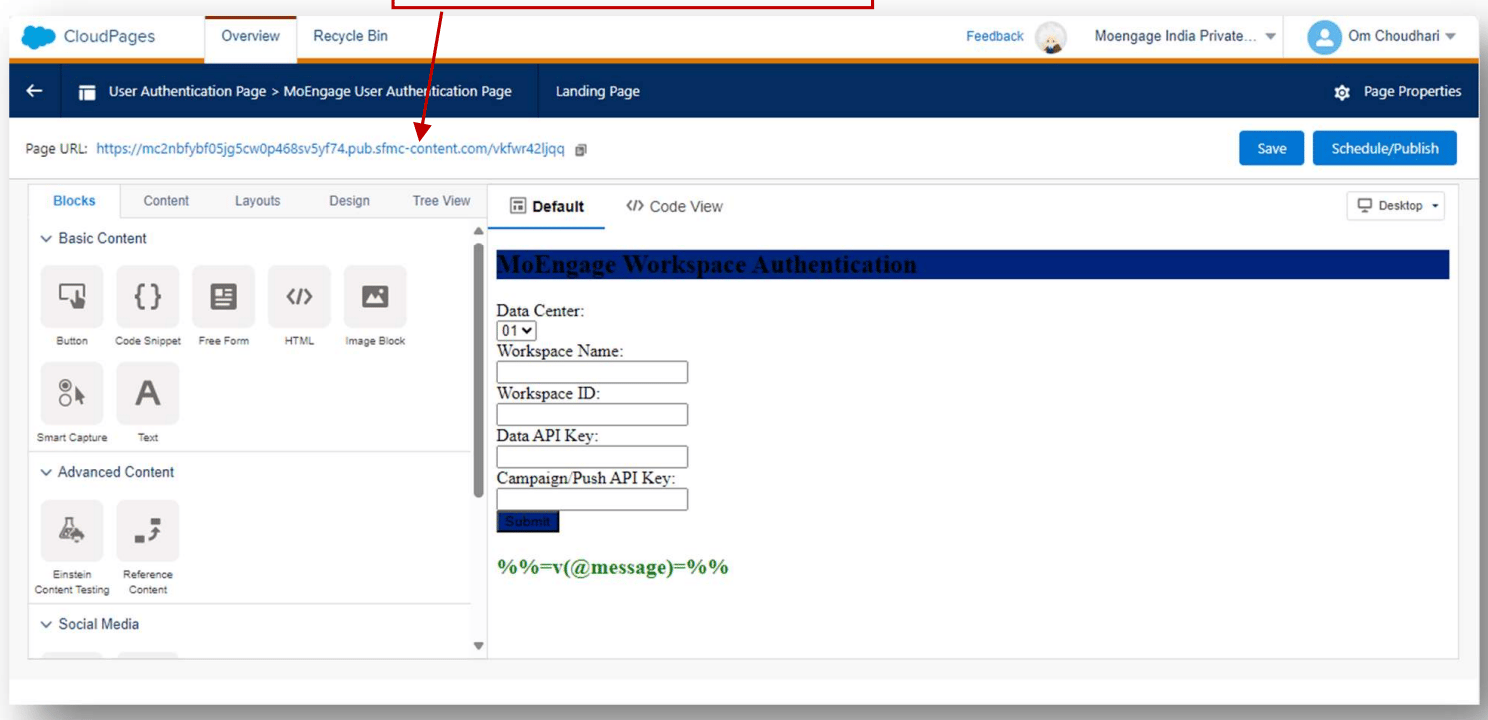 3. Enter details of your MoEngage workspace and click Submit.
| Field | Value |
| ----------------------- | ----------------------------------------------------------------------------------------------------------------------------------------------------------------------- |
| Data center | Select your MoEngage data center. Refer to [Data Centers in MoEngage](https://www.moengage.com/docs/user-guide/data/key-concepts/data-centers-in-moengage) for details. |
| Workspace Name | Enter your workspace name. It is present in the header on your MoEngage dashboard. See the screenshot below. |
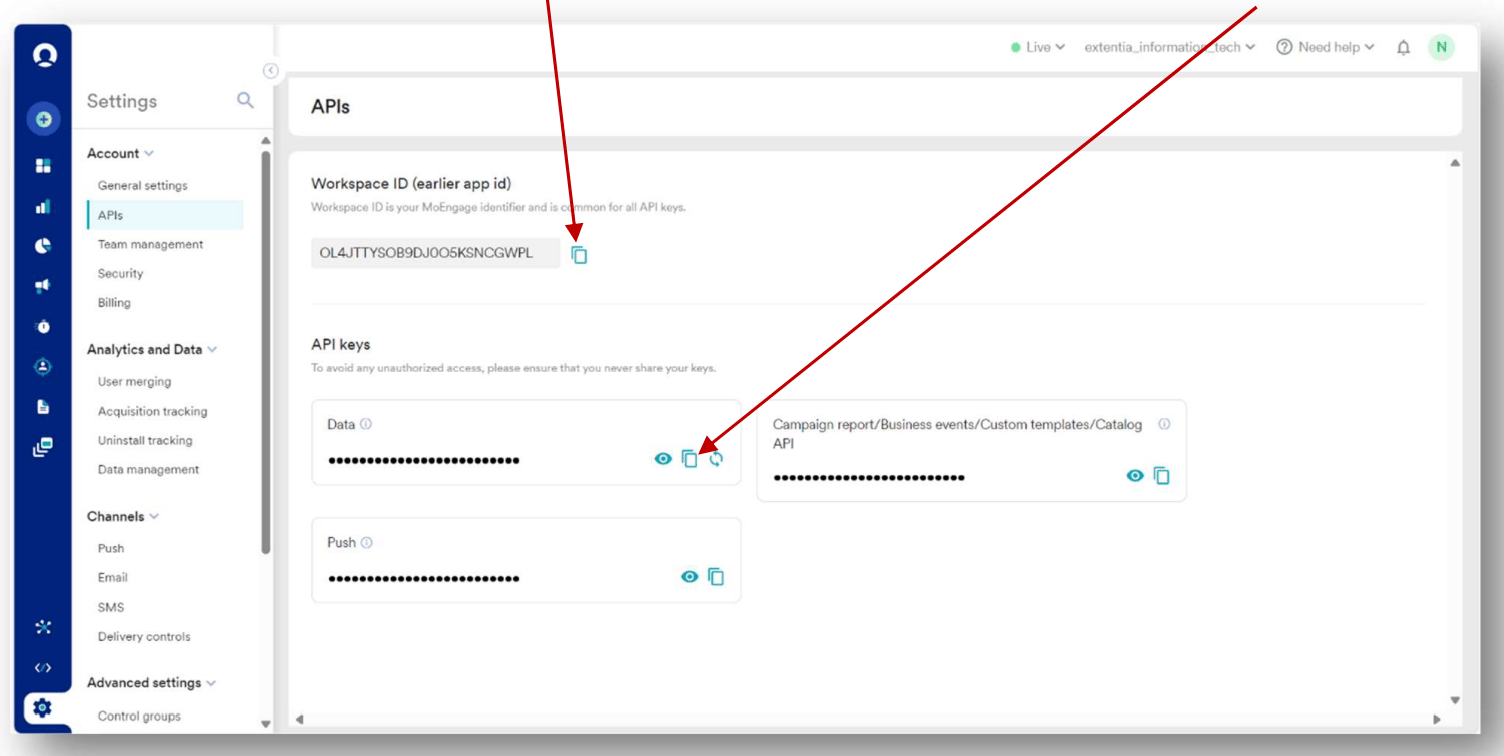
| Workspace ID | Navigate to Settings > Accounts > APIs. |
| Data API key | Navigate to Settings > Accounts > APIs. |
| Campaign (Push) API Key | Navigate to Settings > Accounts > APIs. |
3. Enter details of your MoEngage workspace and click Submit.
| Field | Value |
| ----------------------- | ----------------------------------------------------------------------------------------------------------------------------------------------------------------------- |
| Data center | Select your MoEngage data center. Refer to [Data Centers in MoEngage](https://www.moengage.com/docs/user-guide/data/key-concepts/data-centers-in-moengage) for details. |
| Workspace Name | Enter your workspace name. It is present in the header on your MoEngage dashboard. See the screenshot below. |
| Workspace ID | Navigate to Settings > Accounts > APIs. |
| Data API key | Navigate to Settings > Accounts > APIs. |
| Campaign (Push) API Key | Navigate to Settings > Accounts > APIs. |

 \[Optional] After done, you can also validate if the newly added workspace is present in the Data Extension.